There IS a way for my students contribute placemarks to a Google Map. A way that doesn't require them to use my login, or even have a Google account. Here's what you do:
- Create a Google Form - Students will use this form to enter their placemark information. This will put their information into a Google Spreadsheet. No login required. They just need a link to the form.
- Use Map A List (www.mapalist.com) to auto-generate a Google Map that's linked to your spreadsheet.
Details
To set up your Google Form, you need to know that Map A List determines location using the following fields:
- Address 1
- Address 2
- City
- State
- Zip
- Country
- Latitude*
- Longitude*
You'll then want to add three additional fields for the placemark information.
- Title - What appears for the title of the placemark.
- Additional Info - What appears as the text in the popup window. This field will also accept HTML code. So any code you can copy & paste into Google Maps will work here too.
- Placemark Symbol Identifier (optional) - This could be a multiple choice item in that your students use to select what type of placemark they want.
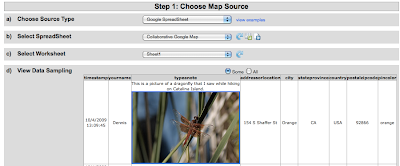
Once your form is done and you've started collecting information, go to Map A List and sign-up for an account. After that, you'll need to give Map A List authorization to access your Google Spreadsheet. Once that is done you can start creating your map. It's a simple step by step process.
Select the spreadsheet that contains your map data.

Match the fields in your spreadsheet to the ones that Map A List uses to create your placemarks.

Once that is done, Map A List will check to see how many locations it can find based on the information in your spreadsheet. It does a surprisingly good job of determining locations even with incomplete information.
If you added a field that determines what type of placemark to use, the advanced feature on the next step is where you enter that information.

The last step is where you save your map and set a few final options. If you want to be able to send a link to your map to others or embed it on your web page or blog, you'll need to make it public.
Here's a link to the Google Map I created with my form. If you added data to the form, it may take a while to appear on the map. I set mine to update automatically, but noticed that sometimes I need to go in to Map A List and tell it to update the map manually if I want to see new data added the spreadsheet.
Classroom Applications
Students can participate in this type of collaborative map by...
- Mapping Birthplaces. It could be their own, or someone else's. Our 5th grade is working on immigrant reports right now. This would be a fun way to share their information.
- Historical Places. Students could work together on a class project locating and posting information about historical places around their state or country.
- What's The Weather Today? Classes from several different schools could pick a day and share the weather. They could even embed a picture of what it looks like outside.
- Breakfast Around the World. The form could be shared with as many people as possible to find out what people around the world eat for breakfast. Hmmmm. This idea sounds familiar.
- I'm sure you can think of other ideas...
Add lines? Highlight regions? Draw shapes? I haven't figured these out yet. If you have any ideas please share them.
By the way Google, this does not let you off the hook. I'd still like to see a SHARE button on Google Maps.


5 comments:
Hey there - Benjamin from MapAList here. Thanks for writing about our site!
You best bet for adding lines, polygons, etc. to a map is to download it to KML (simply click on the disk icon below the map) and then import it into Google Earth or Google Maps.
Happy mapping!
Thanks so much for your post! Logins are always an issue for me in the elementary setting.
As an alternate way to have students collaborate on maps, I've been using Scribble Maps (http://scribblemaps.com). It gives many of the same features Google Maps can without having to set up forms. You can save the map you create to a unique URL and password (still no ID needed) and share it with others. They can save changes as long as they have the correct URL and password.
I haven't played around with forms at all. I can see I really need to!
Benjamin,
Thanks for creating the tool. I really enjoy using and plan present about it to others.
Linda,
Just checked out scribblemaps. I like the collaborative possibilities. Thanks for the link.
Wow, how lucky that I stumbled across your page! I've been searching high and low for a way to create a collaborative map to study dialect variation in the United States, and until now, haven't had much luck at all. Now I'll be able to have respondents provide data without having to worry about tampering with the "public" aspect of a all-access map. Thanks so much!!
I knew this could be done but hadn't gone through the steps. This is perfect for the social studies teacher who wants geographic awareness for their weekly current events postings. I'm off to set it up now! (If I run into issues, I'll be back!) Thanks so much for posting the steps so clearly.
Post a Comment