Tuesday, December 18, 2007

Festive, Fun, and Free

Yes, it's true! Christmas Break is just hours away,
And when that last school bell rings you will jump up and say,
"No more lesson planning, or staying up late
grading papers! (At least until 2008.)"
Instead of watching the kids deck the classroom and halls,
You'll be fighting adults as you dash through the malls.
Grabbing last minute gifts to put under the tree.
Hoping maybe you might get that last Christmas Wii.
But in the midst of this spending spell you've been put under
You suddenly stop, shake your head, then you wonder...
Perhaps the best gifts have no paper or bow.
Maybe these gifts come from Web 2.0
They're posted online, so at the press of a key.
You've got holiday fun that's both festive and free.
So when you escape from the malls and the stores,
And finish all your 200 pre-Christmas chores,
Take a minute to check out these holiday sites.
I hope they give you and yours some joys and delights.

Make Your Own SnowFlake

Remember back in school when you folded paper and cut out snowflakes? Here and online version without the mess. Thanks to fellow Twitterer mrmartinsclass. Note: I also spent way too much time playing that TimezAttack game he mentioned this morning.

Gingerbread House

Remember those Highlights magazines you used to read as a kid while waiting at the dentist's office? Here is a holiday activity from their web site. You get to decorate your own gingerbread house. If the music gets annoying, you can always turn it off. (Thanks to jgingerich for mentioning this one on your blog.)

ScrapBlog

Use this great free site to create your own custom "e-cards". They've got some great Christmas templates to get you started. Just add your own photos, videos, or sounds. When you're done, you can e-mail your family and friends a link to your scrapbook, embed it in your blog or wiki, or share it on MySpace or Facebook.

Do you have any other fun Holiday sites to share? Please post a comment and let me know.

Sunday, November 11, 2007

A Not So Simple Solution

Sorry if this post gets a little more technical than usual. Sometimes there just doesn't seem to be a simple solution.

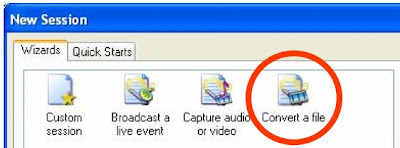
I really like Microsoft PhotoStory. It's a simple, easy tool that lets teachers and students create digital stories. What's not simple is trying to play these stories on a Mac. This has become a problem because some of our teachers like to post their PhotoStory files on their class web site. Parents with Macs at home can't view them.

Flip4Mac is a free Quicktime plugin that allows the Mac Quicktime player to play Windows Media files (wmv's) but for some reason it will not seem to play files created by PhotoStory. Real Player for Mac won't play them either.

After a some research I discovered something about the PhotoStory Video Codec. Apparently Microsoft PhotoStory 3 does NOT use the standard Windows Media Video (WMV) codec but a special codec developed for compressing still images: Windows Media Video 9 Image v2.

One solution for playing these files on a Mac is to convert them to .mov files. I've used Zamzar and that seems to work but the file size increases. My 6.5MB Photostory file converted to a 16.2MB .mov file. Even though the file size more than doubles, the picture quality of the converted file doesn't seem to be as good.

Another solution is to use use Windows Media Encoder (another free download from Microsoft) to convert your PhotoStory file to a file that will play on Quicktime with the Flip4Mac plug-in.


When you convert your file using Windows Media Encoder, use the following settings:
  1. For "Content Distribution" select - File Download (Computer Playback)
  2. For "Encoding Options" select...
  • Video - VHS Quality (250 Kbps VBR)
  • Audio - CD Quality (VBR)

My 6.5MB photostory file converted to a 11.3MB wmv file that plays on my Mac.

Using media encoder seems to give me a better quality conversion and lower file size than using Zamzar and converting to a .mov file.

Now I just have to train our teachers to convert their completed video file before they post it online AND tell our Mac using parents that they need to download and install the Flip4Mac plug-in to view their class videos.

As I said, sometimes the solution is not that simple.

Thursday, November 01, 2007

Fight Plagiarism with Creativity

Right now my school is on the verge of a new technology adventure. Next fall we hope to be starting a one-to-one program in our sixth grade, expanding that program to our whole middle school over the next three years. Currently we’re hip deep in implementation meetings and discussions over how we’re going to present the program to parents and how we plan to train our teachers. One of the big concerns is how this new technology is (or isn’t) going to change the way we teach.

If every student has a notebook computer and access to all the information and communication tools that it offers, then our teachers need to be able to design lessons and projects that engage the students and force them not only to find information, but to evaluate it, check it for accuracy and bias, and use it in a meaningful and creative way. We don’t want our teacher training to focus primarily on specific software packages or hardware tools without addressing ways in which they can be used to encourage students’ critical thinking and creativity in core curriculum areas. Otherwise these new notebooks become just a high-tech version of what we’ve always done. The machines just become nothing more than an electronic textbook. Instead of paper worksheets and tests, students will have electronic worksheets and tests and instead of writing their reports on paper they’ll be typing them in a word processor. If students aren’t given opportunities to be creative, the truly creative kids will quickly get over the novelty of the technology and start looking for the quickest, easiest ways possible to give the teacher what they want so they can “be done”. Cheating and plagiarizing begin to look really attractive.

Thinking about all this brought me back to an article I wrote in 2004. (I knew some of this stuff sounded familiar.) I don’t know if the publication is available online so here it is again for your reading pleasure. (Am I plagiarizing from myself now?)

Fight Plagiarism with Creativity (from May 2004)

It’s confession time. We all have our dirty little secrets and this one has been weighing on my conscience for far too many years -- since 5th grade, in fact. I want admit now and confess publicly that most, if not all, of my state report on Oregon was copied from the encyclopedia. It’s not something I’m proud of, but those words scribbled on my paper were not my own. They belonged to the writers and editors of the World Book Encyclopedia. Yes, it’s true. I am a plagiarist.

For 27 years now I have had to live with the guilt that I was given a grade I did not deserve. Although I suspect my teacher probably knew that I had copied my work, I was never confronted about it. It would have been easy for her to prove that I had plagiarized. The encyclopedias were right there in the back of the room. All she would have had to do is look up Oregon and it would be plain that I was passing someone else’s work off as my own. She didn’t, and I have been suffering ever since. (Perhaps that was her intention all along.)

What brought me to this miserable state? Why did I decide to come clean now? Recently a teacher at my school brought me a paper that was allegedly written by one of his students -- two pages, double-spaced, with the student’s name at the top and no cited references whatsoever. “I’m pretty sure this paper was not written by the student.” He explained. “You’re the computer teacher. Do you think you can prove this was copied from the Internet?”

After scanning the paper and noticing several words that even I would need a dictionary to define, I agreed to give it a try. I went to www.google.com, took the first six words from the student’s second paragraph, and typed them in the keyword search box, putting them in quotes to search for an exact phrase. I could have chosen the first paragraph, but I figured the student might have been smart enough to change the wording of the first sentence. When I clicked “Search”, the first web site on the list caught my eye. I clicked the link and viola! There it was, word for word.

“We got him!” I whispered to myself, with the same exuberance of the Marines who captured Saddam Hussein. I hit the print button to get a hard copy of the evidence, but while I listened to the whir of the inkjet my mind went back to my fifth grade state report. It was so easy to prove that he had plagiarized. My excitement quickly evaporated and was replaced by guilt and remorse.

In my defense, when I copied my report 27 years ago I had to actually read all the material and then write the information word for word. So I was learning about my state as I was copying, right? Using the Internet, this student didn’t even have to read the article. All he had to do was copy, paste, and print. I seriously doubt that any learning about the subject matter occurred at all. It probably took me over an hour to plagiarize my report. This student did it in a matter of minutes. Isn’t technology wonderful?

If the whole point of letting our students use the Internet for educational research is that they actually learn about the subject, then maybe the traditional assignment to “write a report” is not the right approach. It makes plagiarism very tempting. If I can complete my assignment in a matter of minutes, why spend hours writing the same thing in my own words? Recently, I attended a Computer Using Educators conference where Ted McCain, a teacher and speaker for the Thornburg Center for Education offered a different, more creative alternative to report writing. Here is his example.

What if, instead of having your students write a report on Japan, they take on the role of travel agents, with you as their client? You tell them you want to visit several places with historic significance, try eating various local delicacies, and learn about the major industries so your company can do business with them. Your students would then be assigned to write up a travel proposal with the information you requested, along with travel time and weather (so you know what clothes to pack). You could even ask them to suggest several hotels near some of the places you wish to visit and maybe list several different airlines that fly to your destination.

Let’s see your students try to plagiarize an assignment like that. Not only will they learn about Japan, but they will gain “real world” research skills as well. Their task is specific, and their objectives are clear. It may take a little work on your part to create the assignment and develop a scoring rubric for their work, but I’m sure the results will be well worth the effort.

Of course your assignment does not always have to be in the form of a written report. This spring our seventh graders were studying human anatomy. Rather than writing a report, they created Power Point presentations describing how to take care their pet liver, spleen, stomach, etc. In their presentations they explained what “tricks” their pet organ could do, why it is important, and what needs to be done in order to keep it healthy. At the end of the presentation they were also required to have a slide that listed the web pages they used for all their information and pictures. If they did not list the web site it came from, they could not use it. It’s amazing what the kids were able to accomplish because they were motivated and allowed to be creative. Best of all, the work they produced was their own, not something copied from a web page. If you are interested in learning more about this project, you can download a copy of the assignment sheet and scoring rubric at www.geocities.com/dennis_grice/pet_organ.pdf. (Thanks to Yvette Stuewe for allowing me to post her assignment sheet.)

It’s been said one of the best ways to keep from sinning is to avoid putting yourself in a situation where you might be tempted. By adding an aspect of creativity to your assignments, not only do you make it difficult for your students to plagiarize, you also provide them with an opportunity to exercise their own creativity. All the while, they are actually learning about the subject, not just copying information.

Saturday, October 13, 2007

VoiceThread Update

Okay, I'm really becoming a fan of VoiceThread. In fact I'll even be including it in a Digital Storytelling workshop I'm presenting later this month. Last week VoiceThread updated it's site and added a few new features. One big difference is that there are now two versions of VoiceThread - the free version and the Pro version. Those of us who signed up for the free version are now limited to creating only 3 voicethreads with a maximum of 50 slides each. The pro version, which costs $29.95/year, gives you unlimited VoiceThreads and storage and also give you the ability to upload mp3 files for your comments. So pro users can, for example, record, mix, and edit their audio comments using something like Audacity to create more professional sounding presentations.

Here's the good news. K-12 educators can sign up for a special pro account for free. First you need to register for a free account and login. Next you find and click where it says "Go Pro". At the bottom of the page will be a link that says "K-12 Educators Click Here". That will take you to the educator application form.

How is the new VoiceThread site different from the old one? Here's a look at some of the changes.

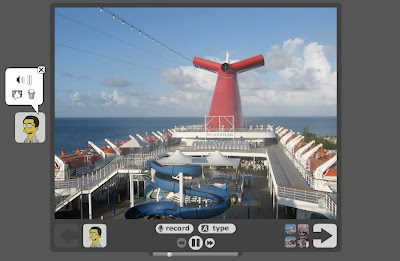
When you view a VoiceThread the screen looks a little different.


If you have trouble reading my comments, click the image to make it larger.

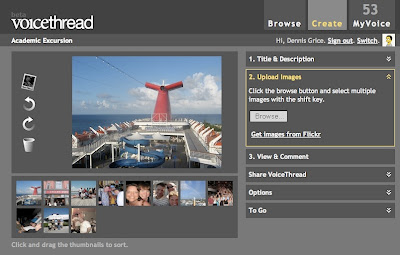
When uploading and rearranging pictures they've made things a little easier and given you a few more options.


Click image to make it larger.

When you click SHARE to add friends to your VoiceThread account or invite friends to view or edit your presentations, you can now see each friend and their edit rights all on one screen. Note: The button to add new friends is now located at the very bottom of your friends list. It took me a little while to find this.


Click the image to make it larger.

When setting my sharing options, I like to set my VoiceThreads to "Public, no comments". This allows anyone to see my presentations, but only those people I invite can comment or edit it. Since I generally trust those who I invite, I turn comment moderation off so when my friends comment, their comment is posted immediately. If you are working with students and concerned about privacy issues, you may want to keep your VoiceThread private and turn the moderation on so you can check what your students say before the rest of the class can hear it.

Want to participate in a VoiceThread. I've created one for an elementary project called Seasons. I'm looking for students or teachers to post pictures and share what the seasons are like where they live. Please comment or e-mail me if you would like to participate. Click on my profile for my e-mail link. Here is how the project looks so far:


If you can't view the embedded presentation, here is a link to it at the VoiceThread site: http://voicethread.com/#b10538

Happy storytelling.

Sunday, September 30, 2007

Your Pictures Tell A Story

It's Sunday night and I'm sitting at home watching the new Ken Burns series "The War" on my local PBS station. If you've seen Ken Burns work before- like the Civil War series - you know that he is a master of telling a story using still pictures. His combination of pictures and voices, often from the very people in the pictures themselves, not only tell a compelling story but they often reach down and grab you emotionally as well. There's something about adding a human voice that brings the photos to life.

One great tool for doing this yourself is Microsoft's Photo Story3, but you're limited to working on your own project and your own computer. One person, one idea. If you really want your stories to take on a life of their own look at VoiceThread. It adds a unique collaborative element to photos and voices by allowing others to add their own voice comments to your photos or upload their own photos and comments. Imagine the collaborative possibilities!

Here's how it works. First you go to VoiceThread and register. Your ID is your e-mail address. Next you create a new VoiceThread, give it a title and a description, and even add some tags for searching.

Now you're ready to start uploading pictures. Pictures can be from your computer or brought in from your Flickr account.


Then it's time to start adding your voice comments to your pictures. All you need to do is go to "View and Comment" and click the record button to start adding your voice.

Now that you've got your thread started, it's time to share it with others. Click on Share VoiceThread and you can invite others to view and comment on your pictures. Once you invite someone you can grant them edit rights, giving them the ability to upload their own pictures. By default, your VoiceThread is private - only those you invite can see it or comment. You can make it public two different ways. 1) Allowing anyone to view and comment. 2) Anyone can view but only those you invite can comment.
NOTE: If you want to be able to embed your VoiceThread on a blog or web page, it needs to be public.

To try out some of the collaborative capabilities of VoiceThread, I created a test project about the Discovery National Institute I attended this summer. I invited several of my fellow shipmates to participate, asking them to add a picture and share a story from our "Academic Excursion". Here's a what the project looks like so far... (If you click on the photo you can zoom in and out.)

If you can't see the embedded VoiceThread, follow this link:
http://fresh.voicethread.com/#b7495


After some experimenting we discovered that pictures brought in from Flickr seem to work more reliably than those that were uploaded directly. I also noticed that the audio quality varied depending on the microphone and audio settings on different machines, but overall I was quite pleased with how easy it was to create a collaborative project.

If you want to use VoiceThread with your students and don't want them to have to register with an e-mail address, you can go to Yahoo or HotMail and create a generic class e-mail address that you can use as your VoiceThread ID. Then you can add additional identities for your students to use when commenting on photos. Since VoiceThreads can be private, only those who know the e-mail address and the password will be able to see the students pictures or hear their voices. VoiceThread has posted directions for teachers that explain how to do this.

Would you like to participate in a VoiceThread project? Amy Lundstrom has started one called Landforms Where We Live. Take a look at it and if you'd like to participate, leave me a comment.

Or go ahead a start your own VoiceThread. Here are just a few ideas to get you started:
  • If you teach 5th Grade, perhaps you could try to get students from different states to post a picture and information about their state.
  • Have students scan an old picture of their grandparents and asj them share what happened in that picture - a living history.
  • Younger children may be interested to see what the seasons look like in different parts of the country. Have students upload a picture of what Fall is like in their area and describe the scenery and the weather.
What ideas do you have? Any thoughts or questions, please let me know.

Wednesday, September 12, 2007

BWAIN (Blog Without an Interesting Name)

Normally I try to come up with some sort of catchy title for my blog posts. For some reason I just blanked on this one. Sorry 'bout that.

To make up for it though, I thought I'd share a few interesting lesson ideas and web resources that I've sent out to our teachers during the first two weeks of school. Here goes...

Futures Channel (www.futureschannel.com)
Ever have kids in your science and math classes ask you, "Why do I need to know this stuff?" Here's your answer. This site has videos of real people using real math and real science in real life! The videos also have printable (PDF) classroom activities.

Math Playground (www.mathplayground.com)
Need an activity for your students in the computer lab? Or would you like to recommend something they could use to practice their math skills at home? This is it. I actually met creator Colleen King, or rather her Second Life alter ego Kristy Flanagan, while chatting at the Bloggers Cafe. (NOTE: Second Lifers should also check out the Math Playground Virtual Math Center on EduIsland II)

HM Technology Resources (hmtech.wikispaces.com)
For those of you using Houghton Mifflin's Reading series, here's a site with links to supporting web resources compiled by Eva Wagner.

ReadWrite Think: Student Materials (www.readwritethink.org/student_mat)

This site contains a whole collection of online activities for your students to work on at school or at home. Browse through this rather extensive list and try out a few that look interesting. When you click on the tool, you'll get a list of grade specific lessons that could be used with it. See how these tools might fit into your Language Arts or Literature curriculum.

Back to School PhotoStory3 Project (web.mac.com/jennifergingerich)
Jennifer Gingerich comes up with yet another one of those "its so simple why didn't I think of it" ideas. This great project for primary grades can be created using a digital camera and Microsoft's PhotoStory3 or Apple's iMovie. I love hearing the kids' voices on the video.

Now the race is on! Who will be the first to use one of these ideas or resources in their classroom this year? Will it be one of our teachers? Or will it be you? If it's you, please post a comment and let me know how it went.

Saturday, September 08, 2007

The "Secret Society" of Bloggers

For the last few weeks, I've been struggling with this question. "How do I get teachers excited about blogging?" Well, I could write a blog that explains how valuable blogs can be as a teaching and learning tool. But then I realized that would be about as effective as handing someone a DVD called "How to play a DVD". If they could play it, they wouldn't need to watch it. And if you're reading a blog about blogging you're probably already aware of the value. Okay, so blogging about blogging is out. What else can I try?
Can we reach those non-bloggers by blogging? Obviously, no. - Webloge-Ed, January 2007
Essentially there are two kinds of people, those who blog and those who don't. Happily I'm a member of those who blog, but I'm in the minority. Those who don't blog, seem to look at those of us who do like we're members of some secret society. We have this mysterious network and communicate in strange and cryptic ways. Want to see an example of the gap between the do's and don'ts? Walk into a teacher meeting and tell your colleagues, "I'm sorry I was late. I was tweeting with one of my Second Life friends about a Webinar we had last week and was trying to set up time when we could Skype about it." I'm guessing you'll lose most of them after, "Sorry I was late."

It's obvious that training is needed. But watch out! While the corporate world can force technology change on it's employees, trying to do that with experienced, tenured, educators invites disaster. A different approach is needed.
Why do we treat teachers so delicately? Why do we forgive them year after year for not adopting contemporary information and communication tools? Why are we satisfied with small steps? Well, the answer is simple. Teachers are special. They are smart, resourceful, incredibly accomplished, and they work miracles — they make a difference. They influence so many lives and they are revered. It’s clear. How can we treat them with anything but awe and respect... David Warlick, September 3rd, 2007

It looks like a step backward is necessary. How much sense does it make to tell a teacher they should be making a blog when they're not even reading blogs? Look how I got started. Someone told me about a great blog (Weblogg-ed) and at first I treated it like a web page. Then I began bookmarking interesting blogs and checking them periodically. Later I discovered that I could add live bookmarks to my Firefox toolbar using the RSS link. Now I'm using an aggregator, Google Reader, to keep track of the dozen or so blogs I follow. I was reading blogs for months before I even considered making my own, but it was a process.

So the first step is to get teachers reading blogs. I like to pick pick out a few teachers and start by sending them links to some blogs that might be appeal to their discipline or grade level. The goal is to get them excited and let their enthusiasm generate interest among their colleagues. Here's a good place to start. (Thanks to Amy Lundstrom for the link.)

If they like one or more of the blogs, I show them how to subscribe to it using RSS. Here's a great little video clip that explains RSS in plain English.


Once teachers have started taking control of their information using RSS, they've reached the first step - they've become consumers. They have also taken their first peek into our secret society of bloggers. To get them in the rest of the way, you want to encourage them to start commenting on other people's blogs and eventually try creating one of their own.

I really like how this graphic explains the 4 C's of online communities.
Source: Participation Online - The Four C's

Blogs are just one of many tools available to teachers on the read/write web. To learn more about others, I suggest you check out Jennifer Dorman's course wiki called Online Connections, a recent Cool Cat Teacher Award winner. Even if you're not enrolled in the class, the site is a great resource for learning more about for wikis, podcasting, social networking, social bookmarking, and online collaboration.

Saturday, August 25, 2007

Pecha Kucha

I've seen a lot of bad Power Point. I've been through the agony of bulleted lists in which the presenter read exactly what they wrote, or droned on and on and stretched 5 slides to 60 minutes pointless examples and enough tangents to give a calculus teacher a headache.

What I read in David Warlick's blog today intrigued me. Pecha Kucha is a structured presentation format developed in Japan back in 2003.

Each presenter is allowed 20 images, each shown for 20 seconds each - giving 6 minutes 40 seconds of fame before the next presenter is up. This keeps presentations concise, the interest level up, and gives more people the chance to show. http://www.pecha-kucha.org/


It was originally designed for use by those in the creative fields - art, photography, design, architecture - (see Wikipedia Article) but I believe this type of format could have some useful education applications as well.

What struck me first was the structure. It's like visual poetry. Remember back in high school when you had to write poems? Some types, like haiku, had a very specific structure that you were forced to follow. I remember struggling to be creative while at the same time, sticking to the rules. I hated it, but it really made me focus. How can I say what I want to say effectively within the parameters I've been given?

Pecha Kucha takes that kind of structure and applies it to visual presentations. It forces you to edit what you say so that you are concise and to the point. You also need to make sure you select meaningful visuals - visuals that give impact and emphasis to your words.

Imagine using this format for in-class presentations. Tell your students that their history reports need to be presented in Pecha Kucha format - 20 slides, shown for 20 seconds each. Make a Pecha Kucha describing he fall of the Roman Empire. Make one that shows why we need to recycle, or explains the importance of preserving a local wetland. If 20 slides is too much for the assignment you can, as David Warlick suggests, assign Half Kuchas (10 slides) or Quarter Kuchas (5 slides).

I'd love to hear any Pecha Kucha assignment or project ideas you have.

Saturday, August 18, 2007

Free to YouTube

Maybe this has happened to you. You're online at home and you run across a great video on YouTube. "This would be a great video to show my students!" You exclaim, ignoring for a moment that fact that you are talking to yourself again.

Problem is, you get to school the next morning and discover that your Internet filter blocks YouTube. You sink into depression. That great lesson you were planning is now ruined. "It's not fair!" You cry.

Stop right there! Before you give up and decide to drown your sorrows in a pint of Ben & Jerry's, consider this possible solution...

Zamzar to the rescue!

Zamzar is a handy little Web 2.0 tool that converts files and e-mails them to you. You can upload files to Zamzar, select the file format you want it to be, and Zamzar will e-mail you the converted file. But Zamzar also converts online videos!


Every YouTube video has a URL. Copy this URL and go to Zamzar.


Then...


You'll see a progress bar as the video is uploaded to Zamzar. Then you'll get a message telling you that once the video is converted it will be sent to your e-mail. A few minutes later, check your e-mail. The message will link you back to Zamzar where you can download a copy of the video to your computer.

Once you have the video downloaded, you can show that file to your class or put it in your Power Point presentations. (Be sure to give proper credit.) Since it is now a file on your computer, you don't even need to have an Internet connection to view it.


Tuesday, July 31, 2007

A Digital Story

Digital Storytelling is a powerful way for your students to express their creativity. It's more than just a product, it's also about the process. Let me explain...

My grandfather, Roy Grice (I call him "Grampa"), is 96 years old. Last week I had a unique opportunity to travel with him down to San Diego to see the USS Midway, a retired aircraft carrier, now turned into a floating museum at the Navy Pier in San Diego, CA.

While we explored the ship, it brought back memories of his days in the Navy. Thankfully I was able to record some of his recollections and put them together into the podcast embedded below. While the recording probably has more value to me and my family, it also offers a glimpse into one man's view of history - as he experienced it.

It's important to me, that his stories live on after he is gone. With the digital tools available today, recording and sharing those stories is now easier than ever.

While editing this podcast together I must have listened to it more than a dozen times. By going through this process I know I'll retain much more of what Grampa told me - more than I ever would have just listening to him tell it to me once. Plus, I'll be able to go back to it as often as I want.

What digital stories could your students share?

Listen to Grandpa's Story...


The USS Midway Museum


"Grampa" next to a milling machine in the USS Midway machine shop.


Technical Info:
  • Audio edited using iMovie and exported as a .aif file. (I didn't have a voice recorder, so I used a camcorder to capture the audio.)
  • Converted to .mp3 using Audacity.
  • Mp3 file uploaded to GCast.

Monday, July 23, 2007

Tech Tips from the Bahamas

As I mentioned in the previous post, I was honored to be a part the Discovery National Institute last week. Fifty talented educators from 17 states spent a week together on the Carnival Sensation cruising to Nassau and Freeport in the Bahamas. But don't let the words "cruise" and "Bahamas" mislead you - we worked! There were training sessions, group projects, and lots of networking and idea sharing.

What follows is my attempt to list of some of the ideas and resources shared by these amazing teachers, tech trainers, and media specialists.

Note: If anyone from the cruise is reading this, please add a comment to include any great ideas or resources I may have missed.


Science


Stellarium (www.stellarium.org)
From Amy L., Bend, OR
Think of it as Google Earth for the sky. Put in any location and see the night sky and constellations visible from that spot at that day and time. You can also project forward or look backward in time. Requires you to download and install their free application. Versions available for Windows, Mac, and Linux.

The Rock Dating Game (see previous post)
From Howard M - TX, Marty G - MI, Chris P - FL, Dave K - CA, and ME!
Good for 6th Grade Earth Science. Compare and contrast Metamorphic, Igneous, and Sedimentary rocks. Includes an Inspiration graphic organizer and a Unitedstreaming writing prompt.


Language Arts & Writing

Knight Cite (www.calvin.edu/library/knightcite)
From Rachel H., WI
An online tool for creating proper MLA, APA, and Chicago style citations.


Math/Social Studies

Dollar Around The World
From Rachel H - WI, Diana L - AZ, Kim R - CA, Jennifer D - PA, Tanya G - KS
Learn about other countries and currency conversion as your students investigate the value of a dollar around the world.
Assignment directions and web resources (Word File)
International Currency Factsheet (PDF)
Student Notebook (PDF)
Unitedstreaming Assignment


Social Studies/Geography


Where in the World? (web.mac.com/jennifergingerich)
From Jennifer G - OR, Carole G - FL, Beverly P - NJ, Dedra S - OK, Donna T - SC
Remember Carmen Sandiego? This project has students taking video clips from Unitedstreaming and breaking them into little "clues" that their classmates have to solve in order to guess where they are hiding. The project includes a writing prompt and quiz on Unitedstreaming and an Inspiration template with project guidelines.

CommunityWalk (www.communitywalk.com)
From Amy L., Bend, OR
This site lets you or your students create a "tour" by adding placemarks to a map. Each placemark can contain information, links, and/or pictures about that location. Possible uses include mapping out specific landmarks along the Oregon Trail, or creating a virtual tour of local historical sites in your hometown.


Library, Media, and Teacher Tools

Good Reads (www.goodreads.com)
From Bridget B., PA
Read any good books lately? Write a review and post it here. This site is great for connecting you with others who have read the same book and have similar tastes. Use it to create literature circles among your staff or with your students.
Bridget was also involved in the creation of this great video promoting their school library - a must see! (http://multimedia.mtlsd.org/Play.asp?FILEID=12429) Requires Windows Media Player.

Teacher Tube (www.teachertube.com)
From Jennifer G., OR
This is basically YouTube for teachers. It contains online video tutorials, student and teacher created projects, professional development, and more. Teachers can create a free account and use it to host their own videos. Make sure your school doesn't block this one! (You might even win a laptop computer.)

Inspired Learning Community (www.inspiredlearningcommunity.com)
From Jennifer G., OR
Have you created a great Inspiration or Kidspiration lesson? Post it here. Looking for a good one? Search for it here. This is a huge library of teacher created Inspiration and Kidspiration templates searchable by grade level and topic.

Flickr Toys (www.bighugelabs.com/flickr)
From Jeanine B., WI
So you've posted your pictures to Flickr - now what? This site of full of toys to enhance your Flickr experience and have fun with your photos. Make motivational posters, trading cards, movie posters, mosaics, calendars, and much more.


Flip Video (www.theflip.com)
From Katie K., VA
This $85 video camera holds 30 minutes of 640x480 video on its 512MB of internal memory. Video is saved in AVI format and can be transferred to your computer using the flip-out USB connector. You can also watch video on your TV using the supplied video cable.


FMO: For MAC Only

3-2-1 Countdown Widget (www.apple.com/downloads/dashboard/calculate_convert/321.html)
From Amy L., OR
A great little classroom management tool. Add this to your OSX widgets and use it in your classroom to countdown to recess, free time, or to time a test.

Bluetooth File Sharing
From Howard M., Austin, TX
Howard showed me this impressive little trick to wirelessly transfer files to and from Mac via bluetooth. No WiFi connection necessary.
1) Make sure Bluetooth is turned on and both machines are discoverable.
2) Go to the Utilities and open Bluetooth File Exchange.
3) Select the file you want to send to your friends Mac. Click SEND.
4) Select the name of your friend's computer from the list of available devices. Click SEND.
A windows will pop-up on your friend's computer telling them that you are sending them a file. All they need to do is click ACCEPT. The file will be saved on their machine. Is that cool or what?!

Sunday, July 22, 2007

Don’t Take Him for Granite

Sometimes the best way to discourage plagiarism among your students is to come up with an assignment that forces them to take information and present it in a whole new way.

In this project, developed by a team of top educators at the Discovery National Institute, students compare and contrast three similar, but different people, places or things. The three things appear as bachelors on a dating show. The bachelorette asks questions of the bachelors and they must answer in character using the information they compiled while researching their person, place or thing.

It will work with just about anything. Imagine a lovely young lady asking questions of Columbus, Magellan, and Cortez. Or what about Caesar, Alexander the Great, and Napoleon? With a little creativity you could even give personality to inanimate objects - like rocks.

Here’s a fun example of what such a project might look like for a science class. In it we compare the properties of metamorphic, igneous, and sedimentary rocks.


At the end of the project students need to fill in a graphic organizer. This one is just a basic Inspiration template that has been modified slightly.

Graphic Organizer Link (Requires Inspiration Software)

Finally, students are asked to synthesize what they have learned using the writing prompt. Their task is to write a letter to the lovely bachelorette encouraging her to choose one of three rocks, using their research to support their choice.

Writing Prompt Link

Who are these ‘top educators’ you speak of?
What did you do on your summer vacation? Well, if anyone asks I'll say I got to go on a cruise with 50 of the most amazing and talented educators this country has to offer. This National Institute was sponsored by the Discovery Channel. I can honestly say I’ve never worked so hard and had so much fun at the same time. For more info about the DNI Bahamas Cruise, check out Joe Brennan’s blog.

This Dating Game project was a collaborative effort that combined the creative talents of five teachers from four different states. (We’re all listed in the end credits of the video.)

Thursday, June 14, 2007

Let's Go Back to Kindergarten

There are days when I want to go back to Kindergarten. I want to paint. I want to build things with blocks and Legos. I want to make inventions. I want to learn about about butterflies and then make one out of construction paper and see if I can make it fly just like a real butterfly. I want to use my imagination. I want to learn just because its fun to learn. I miss those days.

If you get a chance to observe a Kindergarten class sometime, it won't take long for you to sense the energy in the air. There's an excitement in the room because learning is not about working to get a good grade, learning is fun. Somewhere between kindergarten and high school our students seem to lose this enthusiasm. The model of learning changes from one of creativity and exploration to one of listen, memorize, and regurgitate.

Dr. Mitchel Resnick, the inventor of Lego Mindstorms, would like to bring back the Kindergarten model of education. He emphasizes the need for creativity in a world where our students seem to lack the skills needed to solve problems. In a society where creative ideas and solutions are sought after and rewarded, our school systems seemed focused on teaching to the test.

Last month, Alan November interviewed Dr. Resnick and posted it on his blog. (Go to Alan November's blog to hear the interview.) Dr. Resnick discussed the work being done with his Lifelong Kindergarten Group at MIT where students learn by being creative. They solve problems by inventing robots using Mindstorms and Crickets. They also create and share their own video games online using an ingenious programming "language" called Scratch.

If you have a little extra time, I strongly encourage you to watch Dr. Resnick's lecture given on May 22, 2006 at the MIT Museum.

"Sowing the Seeds for a More Creative Society"
There are two ways to view the video...
1) Download the lecture from iTunes. (FREE 146MB)
2) Stream it from the MIT Museum site. (Requires Real Player)

The video is a little over one hour. The first half is the lecture, followed by a question and answer session.

Friday, June 01, 2007

FREE Inspiration

Writers use them for brainstorming. Scientists use them for solving problems and organizing information. Whether you call it a word web, a concept map, or just a bunch of little boxes connected with arrows, the process writing down concepts, figuring out how they are related, and connecting them together can be a valuable teaching tool.

Two of the most well-known software tools for doing this are Inspiration and its primary grade companion, Kidspiration. These programs are great, but they are not cheap. In fact school licensing for these can be almost as expensive as licensing Microsoft Office.

Now, finally, there is a FREE alternative to Inspiration. It’s called Cmap Tools. You can download it from their web site. (http://cmap.ihmc.us/download) Mac, Windows, and Linux versions are available.

When you install it and run it for the first time, you will be asked to create a username and password. This is required so later on you can share your concept maps with others or even set up a collaborative concept map that can be edited by multiple users. Even if you don’t want to do this, you still need to create a username and password in order to use the product.

If you’re used to using Inspiration, you may find the Cmap Tools does things a little differently, but those differences are not major. You can’t do “rapid fire” concept maps and there is no clip art included in the software. You can add images, links, and annotations. You can also link to Word documents, videos, and other Cmap files.

To get a good idea of what the process of creating a concept map is like, take a look at this tutorial video they have created. Creating Concepts and Propositions (requires Quicktime)

They also have other tutorial videos that explain how to use the software:
Adding Resources
Introduction to the Views Window
How to Create a Folder

The one thing that Cmap Tools seems to be lacking is the ability to export your concept map as an outline that can be opened in Microsoft Word. There is an “outline view” that can be exported as text (.txt) but the text does not have the traditional outline formatting (I, II, III, A, B, C, etc.)

On the plus side, your concept maps can be exported as jpegs and as web pages (html). You can also upload your map to one of their public Cmap servers (I have yet to try this) and make it viewable to anyone with a web browser. Once it is online, your map is given a unique web address (URL). Anyone with a web browser can access it, and anyone with Cmap Tools can be invited to contribute and edit it.

I’m already brainstorming on ways this software could be used with students. Here are a couple of ideas:

“What’s the Connection?”
Use Cmap Tools to create a collection of terms. Save the file. Have students open the file, look at the terms, and figure out how they are related. It’s up to them to move the terms around and link them together with arrows using the correct propositions.

“Family Tree”
Have students start by typing their name as the first concept. Then they add their relatives around them as different concepts. Finally they need to add links stating each person’s relationship to the student (brother, sister, cousin, uncle) as well as their relationships to each other.

I still think Kidspiration is a valuable tool for primary grades and would not want to replace it, but I could definitely use Cmap Tools with older students – grades 5 and up.

Check it out and let me know what you think.

Image Credit: http://cmap.ihmc.us/Support/Help/

Thursday, May 03, 2007

Let Them Be Heard - ONLINE!

Any primary teacher can tell you that students' reading improves if they can hear themselves read. Remember using that old Califone cassette recorder in the back of your classroom? Here's a new twist to that activity - Student Audiobooks.

Many of you have students write their own stories. First Grade teachers at Grandview Elementary School have taken things a step further. Their first grade student write stories. Then they read those stories into a digital recorder. Their teacher then adds a little music to the beginning and posts them on their class blog.
"The stories were recorded using an iRiver mp3 recorder, the music was added and the stories were edited using Audacity, the music clips come from FreePlay Music, the stories are being stored at the archive.org website and this blog is hosted by Edublogs in Australia."
Visitors to their class blog can click on the links to hear the students' "Audiobooks". What's pretty cool is the audio files are in MP3 format so they can be imported to iTunes and copied on to an iPod.

Even if you don't have a fancy digital voice recorder, you can still hook up a microphone to your classroom computer and record with Audacity or Garageband.

NOTE FOR GARAGEBAND USERS: If students illustrated their own stories, you can scan or take digital pictures of their pages. Then using Garageband, you can insert those pictures above the audio track to create an "enhanced" podcast. Listeners would not only hear the students read, they could also see their artwork.

Now students can go online and listen to their stories and those from other kids in their class. Parents can go online and listen to their children read, or download it to their iPods to share with family and friends.

Monday, April 30, 2007

Change is...

Complete the following sentence:
Change is _______.

a) good
b) bad
c) inevitable
d) all of the above
Our world is changing and the web is changing along with it. Below are a couple of video clips from You Tube. The first one from Colorado educator Karl Fisch helps us get a handle on how the world is changing. The second offers a glimpse into how the web is changing to keep up.

NOTE: If your school blocks YouTube, watch these when you get home.


Thursday, April 26, 2007

A Simple Solution

This Internet tip is an oldie, but a goodie. I've known about it for a long time but never really made use of it until this week. It really saved me a lot of trouble.
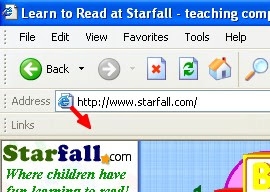
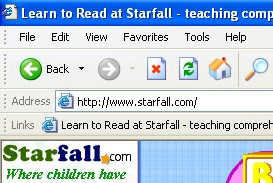
There are some great web sites out there for primary kids. One of the best ones out there Starfall, but there are other good ones as well. I know I can trust first graders to double click on Internet Explorer, but I don't want to deal with having them type in a web address. Even asking them go to Favorites and select the correct one, can be a chore. To solve this, I've taken some of the web sites most often used by our primary grades and put them in the Links toolbar. This way the kids just have to open Internet Explorer, click on the correct link in the toolbar, and Viola! they are at the correct web site in no time.

Here's how...

1. Open Internet Explorer.
2. Go to the VIEW menu, select TOOLBARS, and make sure the LINKS toolbar is checked.

If it is, and you still don't see the links toolbar, it may be hiding down at the end of your Address Bar.

If so, just go to drag it down below the Address Bar. If it won't move, you may need to unlock the toolbar - Go to VIEW, TOOLBARS, and uncheck LOCK THE TOOLBARS.
3. Go to a website you want to add to your toolbar.
4. Drag the address from the Address Bar down to the Links Bar...

...and a new link is added.
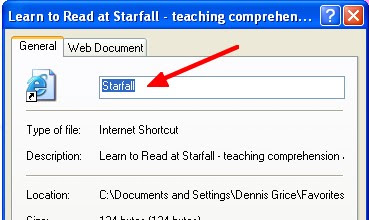
5. To make room in the Links Bar for more links, you may want to shorten the name of the link. To do this, right-click on the link and select properties. Click on the General tab and change the name to something shorter.

6. To delete a link from your toolbar, just right-click on the link and select DELETE.

Here are some primary grade web sites I have on my Links Bar: Starfall, Mr. PicassoHead, Ben's Guide to US Government, White House Kids Page, US States Games, I'm sure you can think of some other great ones too.

FIREFOX and SAFARI users, this works for you too. It's called the Bookmarks toolbar.

FIREFOX: Go to VIEW and select BOOKMARKS TOOLBAR. Drag web sites to the toolbar.
SAFARI: Go to VIEW and select SHOW BOOKMARKS BAR. Drag web sites to the toolbar.

Wednesday, April 11, 2007

Potpourri

For those of you looking for a coherent, single topic, instructional blog entry you might as well click the little red “x” and close this window right now. What you’ll be getting today is a hodgepodge of random thoughts and ideas. A Web 2.0 stream of consciousness as it were…


Sounds Good to Me

I’ve devoted several posts to some great video podcasts for use in the classroom, but let’s not forget that there are some pretty good audio podcasts out there too. Getting kids (and teachers) familiar with downloading and subscribing to audio podcasts helps them get an idea of what a podcast is. It also gets them one step closer to producing their own podcasts. Here are a few “baby steps” to get you started:

Grammar Girl’s Quick and Dirty Tips for Better Writing – a weekly program that focuses on writing and good grammar. These 3 – 6 minute podcasts would be good for grades 5 on up. NOTE: You might have to listen to a little ad from their sponsor before they get to the topic.

Radio WillowWeb
– Wow! These kids have really taken student made podcasts to the next level. Great educational content from multiple subject areas, written and presented by elementary students. This would be a great model to follow when introducing your kids to making their own podcasts.

Reading Rockets Presents: Meet the Author – Okay all you librarians, pay attention. This has interviews with various authors including Jack Preletusky, Avi, Marc Brown, Patricia Polacco, Katherine Paterson and many others. A great resource!

Wondering if your kids will be able to listen to these? Try this. Ask how many of your students have iPods. I'm guessing the number will be between 90-100%. Even if they don't have iPods they can still listen to podcasts on their computer. Then imagine giving your kids this assignment, "I want you all to go home and listen to your iPod..." You could be the coolest teacher at your school!


Google Earth Tours

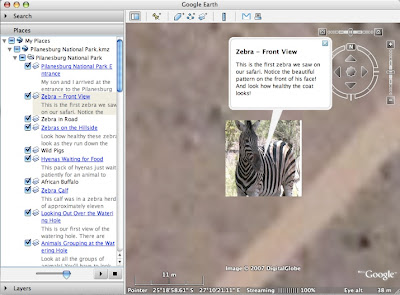
Recently a friend and fellow teacher, Janet English*, had a chance to visit South Africa. One of the many things she did there is visit and take a mini safari in Pilanesburg National Park. What’s cool is she created a virtual tour of the park using Google Earth. The tour lets you follow along on her adventure with written descriptions and pictures. I clicked through this tour with my 5 year old niece over Easter Break and had her try to see how many animals she could name. She got almost all of them.

Wouldn’t something like this be a great way to create digital stories of some of the interesting places you've visited and share them with your class? I’ve definitely got to learn how to do this! When I do, I’ll be sure to post directions for you. I’ll also see if I can get permission to post Janet's virtual tour file in a future blog.

*Janet is currently Senior Director of Education and New Media at KOCE-TV (Orange County's PBS Station)

Speaking of Blogs

As long as I’m talking about South Africa, I encourage everyone to check out Janet’s South African World Summit Blog. It contains some great photos, podcasts, and interviews with children from South Africa and around the world. This is a great way to let your students hear voices and thoughts from kids their own age and see how they are alike and different.

For students studying the American Civil Rights movement, this blog also provides some insight into the current struggle for equality in South Africa. Read and listen to what is going on right now and compare it to our own history. Ask your students if they see any similarities or differences. What have we learned from our experience here in the US that might help them deal with their present situation? (What do you think? An interesting class project?)

Planet Earth

Have you been watching Planet Earth on the Discovery Channel? Not only does this amazing program make me want to spend $2000 for a High Definition TV, it's also got some great educational resources as well. Check out the Discovery Channel Planet Earth site for

Friday, March 09, 2007

Kids Become the Teacher with Wikispaces

Several weeks ago, 8th grade started a project using Wikispaces. Every year our 8th graders go to Washington D.C. In the past they have had to write a report about DC that included information about various monuments, the White House, and other places on the tour.

This year our history teacher, Mr. Harrison, decided to try something different. Roles were reversed and the students took on the job of teacher They were divided into groups of four and asked to design a webquest. Together they were to create several worksheets or tests about different places they would visit in DC. Then they worked as a team to design their own page on Mr. Harrison’s Wikispace. Pages would include links to the worksheet document (they were also required to post an answer key), links to web sites that Mr. Harrison would use to answer the questions, and pictures. The groups were evaluated based on how well they completed their task and how well they worked together as a group.

The Setup

To begin this project, we first had to create a space for Mr. Harrison at Wikispaces. Wikispaces offers free public spaces, but charges for private spaces - unless your a teacher. To sign up for a free, private space (only registered space users can see or edit pages) we went to www.wikispaces.com/site/for/teachers100K and registered.

Once we had a space set up, I worked with Mr. Harrison to create his page that included the project guidelines and instructions for his students. Next I created a blank page for each group of students to edit.

The final step was to create user accounts for each student in the class. Normally, a new user needs to register a unique username and password with Wikispaces and supply their own e-mail address. Then they need to be invited to join the Wikispace by creator or owner of that space. This would not work for us because we did not want to students to give out their e-mail address and we wanted control over the usernames assigned to each student. Fortunately, Wikispaces makes this process easier for teachers. All we had to do is follow the procedure they list on their help page for teachers. We sent an e-mail to help@wikispaces.com gave them the usernames and passwords for each student along with the name of the space we wanted them to join. (Our students already have unique user ID’s on our online learning system and I was able to use the same names for Wikispaces.) After a few days, all the students showed up as members in Mr. Harrison’s space.

Student Instruction

Once everything was finally setup, it was time to get the students working. I took one class period and presented a lesson explaining the nuts and bolts of editing a wikispaces page. I also posted screen captures of certain procedures online for students to review later. Here are links to the screen captures:
I’ve found that when working with students, it’s best to keep the instructions brief. I give them just enough info to get started and let them know what is expected for the final product. It’s up to them figure out the rest on their own and solve technical problems within their group.

One of the advantages of using a wiki is that it keeps track of any changes made to a page. At any time, you can click on the history button and see what the page looked like as changes were made. You can also see which user made those changes. In addition to tracking changes, the history button provides students a safety net. If something gets “totally messed up” you can simply revert back to a previous version of the page and begin working from there. This ability to go back in time makes wikis a powerful tool. Checking page history is also a great way for a teacher to see that everyone in the group is participating.

In addition to the page history, each page also has it’s own discussion board. I was surprised to see how many students used it to communicate with their group as they worked on their pages from home. It was fun to read the posts and observe as students helped each other and answered each other’s questions. One or two kids even got reprimanded by by their group for not participating. Mr. Harrison and I were able to monitor all group communication to make sure nothing inappropriate or malicious was being posted. I was even able to answer a few questions myself - from the comfort of my own living room.

Wrapping Up

At the project deadline Mr. Harrison locked all the student’s pages. This prevented them from making any fixes or updates after the the assignment was supposed to be finished. Most student pages met or exceeded our expectations.

As part of the project, each group was required to write an evaluation, explaining what was learned as they worked on their webquests. Here are some of the comments:

“I thought that this process was very new and different, and at times, very frustrating. But we were able to either leave comments for each other or call each other.” ... “I really liked the idea of the team responsibilities, because that way no one person gets all the load dumped on them.”
“We had to work together to finish this project and it was a little hectic. The hardest part was having to split up the duties evenly so that we all got a grade on it.”
“In the end this was a very good project. It was way better than doing a report. One problem was it was difficult when you could not edit at them same time. This caused some problems but in the end we fixed them. Also at some points it would get very annoying with the page. You would do something and save but it would not keep it. But it was fixed and we finished our project. This was a very good project and we would much rather do this than a whole report by ourselves.”
“This project was very fun for all of us and was a wonderful learning experience, but somewhat difficult. We like the format of the website, but the toolbar was a bit hard. If we could change something about this site it would have to be the pictures, because they were somewhat hard to download. We definitely thought this was 100 times better than a 20 page report!”
Many groups experienced frustration with the Wikispaces page editor as things that looked great in the editor did not always look the same once they were saved. We let students know up front that the editor could be a little quirky at times, and that they would need to work together to solve problems. For the most part, members of the group stepped up and were able to solve their own technical problems.

All in all, I think our first venture into the use of wikis in the classroom went quite well. We’re already looking at other ways to use this tool. If you’re curious about how you can use wikis with your students, Teachers First has some great ideas.

Curious what some our final projects look like? Since this is a private space I can’t include a link, but here is a brief video tour.

Mr. Harrison’s Wikispace Tour (Windows Media Player Required)

Wednesday, February 14, 2007

Fabulous Fotos on Flickr


Here's another FREE Web 2.0 tool for you to try. It's called Flickr. Use it to post photos online to share with just your friends (private) or the whole world (public)! You decide. Signing up is a simple process. Since I already had a Yahoo! Mail account, I was able to use the same username and password.

Once on Flickr, your pictures can posted directly to your blog. (I'm typing this in Flickr right now.) You can add comments and tags to your pictures to make them searchable. I've got numerous pics from my fishing trips in the Eastern Sierras. To find them, just search for all the pictures with the tag "Sierras". Want to see all my Flickr photos? Just click on photo on this blog. Once there, click on "dgrice's photostream" to see my other photos. If you want, feel free to add comments to the photos and even subscribe to my photostream (using RSS).

What can teachers do with this? If you have photos from your vacation that you want to share with your class you can post them on Flickr and give students a link to access them online. They can use your photos in their multimedia projects or use them as writing prompts.

You can also use your vacation photos as a geography lesson. The map feature in Flickr lets you plot your photo locations. To see where my picture was taken, click on it and look under "Additional Information" to see where it was taken. Click the (map) link. For fun, have your student try to guess where a picture was taken, or create a Flickr for your class and have them bring in their own vacation pictures, upload them (with parent permission, of course) and then plot on the map where their pictures were taken.

A word of warning: I suggest you give students a direct link to your photos rather then having them go to Flickr and search everything. Since anyone can post photos to Flickr, some of the images may not be appropriate for use in the classroom.

Monday, February 05, 2007

A New Way to Process Words

If you haven't figured it out by now, I love stuff that's FREE. Imagine my joy when I discovered Google Docs. It's a free basic word processor. There's no software to install - it runs right inside your web browser. You can import a variety of word processing documents from Word (.doc), Star Office, Open Office (.odt), and Rich Text files (.rtf). While you can't import pictures or add clip art, you do have the advantage of being able to access, edit, and print from any computer with Internet access. Just log in with your Google username and password. (I was able to use the same one I use for Blogger.)
But wait there's more!

What makes Google Docs so powerful is the fact that you can Add Collaborators to your documents. By "inviting" others to edit your documents, you can have several people working together on the same document at the same time. You see changes as they happen. What a powerful tool for learning! When a document is finished it can be posted directly from Google Docs to your blog. If you make a document "public" users can subscribe to an RSS feed so they can be updated when any changes are made.

While a great tool like this doesn't convince me to put good old Microsoft Word in mothballs just yet, it sure does make me look at word processing in a whole new way. Google Docs is a great Web 2.0 tool.

Oh, wait! Did I forget to mention you can also do spreadsheets too? It imports Excel (.xls), Open Office (.ods), and Comma Separated (.csv) files.


For more info about Google Docs, take the tour.

Even More Podcasts

At our district technology meeting today, Rene Drevlow from Zion Lutheran School in Anaheim shared these FREE video podcasts she discovered on iTunes. If you have iTunes installed on your computer, clicking on the link will open iTunes and take you directly to that podcast.

Titles for Primary Grades:
Nickjr: Blue's Clues - 3 minute segments from the Nick Jr. kids show.
DragonflyTV Podcast - Ordinary kids doing extraordinary science investigations. (from PBS Kids)
Share the Earth...This is Our Earth - Songs about the Earth (from PBS Kids)
Miss Lori and Hooper - Themed activities, music, and movement. (from PBS Kids)

Want to Learn about Mac OSX?
Mac OS X for Your Classroom - Created by a school district in DesPlains, Ill.
Learn Mac OS X Tiger - a 16-minute video explaining how to set your personal preferences.
Learn Mac OS X - An Apple a Day Keeps the Viruses Away - More system preferences, using AIM with iChat, and more OS X help

If you find any other great iTunes video podcasts for education, please comment and let me know.

Thanks for your contribution Rene.

For more info on how to use Video Podcasts and iTunes, see my previous post (Dec. 6, 2006)

Wednesday, January 31, 2007

Diigo & del.icio.us

If you’re like me, you’ve probably got tons of bookmarks saved in your browser. When I click to look at mine, the list just scrolls down the screen. I never bother to organize them or put them in folders – does anybody? Also, if you’re like me, when you look down the list at some of those pages you’ve bookmarked, you can’t remember why you even saved them in the first place. I have enough trouble remembering where I left my TV remote. Don’t ask me to remember what I was thinking 6 years ago when I bookmarked “The Happiest Potties on Earth
Even when I can remember why I bookmarked a site, those sites are only available to me if I’m using my own computer. There are times when I’m working in a classroom with a student or teacher and have to spend time searching for a site that I could easily find if I had my bookmarks available to me. If only there was a way to put all my bookmarks online so I could access them from anywhere. Wouldn’t that be great? (Here comes the product plug…)

del.icio.us
You might as well call it “Bookmarks to go” (or “Favorites to go” if you’re still using Internet Explorer). The word is the web site. No www’s or .com’s. It’s just del.icio.us and it’s FREE! You just need to register and create a user name. Then you will have your own del.icio.us site where you can add your bookmarks. You can access them from any computer just by going to your site. To help you remember why you bookmarked a site, you can add your own comments (think: reminders) to each of your bookmarks.
In addition to your comments, when you add a bookmark to del.icio.us, you can see how many other people have also bookmarked that site along with the comments they wrote. If you click on another user’s name, you can see their bookmarks as well. This is called “social bookmarking”.
Imagine you’re interested in vintage Volkwagons. You find a great web page and add it to your del.icio.us site. Then you see that 20 other people have also bookmarked and commented on that same web page. If you click on the user name of one of those people you can check their bookmarks and possibly find other great vintage VW web pages - pages that they’ve found that might also match your own interests.
For a more detailed description of del.icio.us, visit Steve Dembo’s Digital Passports blog.

Diigo
Diigo does what del.icio.us does, but takes it one step further. In addition to online bookmarks and comments, you can also highlight sections of your favorite web site right in your browser. Later, when you visit sites that you’ve previously highlighted, those highlights are still there so you can quickly find the info that interested you – without having to re-read the whole page again.
When you highlight something on a web page, you can add a “sticky note” and comment on that specific section. If other people have highlighted and added sticky notes to a sections on that page you can see those too.
Note: When you add comments about a web page, or sticky notes to a section of highlighted text, you have the option to make those “public” or “private”. Private comments and notes can only be seen by you. Public ones can be viewed by the entire Diigo community.
How does all this work? (Here’s the catch.) To see the highlights and sticky notes you need to install a Diigo toolbar to your browser. Without the toolbar installed, you can still see the comments and highlighted text when you look at your bookmark page, but they will not be visible when you view the actual web page. I can still access my bookmarks from any computer, I just need to be using my own computer, or any computer with the Diigo toolbar installed, to see my highlights and sticky notes.
I know it sounds complicated, but Diigo has some great tutorials that demonstrate all these features (and a few more).
Click here to see my Diigo bookmarks.