Remember that scene in the movie "Ferris Bueller's Day Off" where the economics teacher, played by Ben Stein, is asking his students questions followed by the line, "Anyone?...Anyone?..." It's the classic image of students that are NOT engaged. Hopefully your students are not as bored as his seem to be. (Side note: Boredom might actually be bad for your health.)
In "standard lecture mode" a teacher asks a question. One student responds while the others wait their turn. Some may be listening, but it's a sure bet that others are not. How do you get 100% of your class engaged and participating in the discussion?
Here's one way - WallWisher.com. With this tool, you can post a question or discussion item on a wall and all students can participate by adding a sticky note to the wall. Comments are limited to 160 characters. If you're in a computer lab or your kids have computers, you can do this in class and students can see their responses right away. You can also assign it to be done outside of class on their home computer. Walls can be shared between classes, schools, cities, states, countries. It's the Internet so this thing could even go global if you want.
How does it work? Watch the video below.
Wednesday, February 10, 2010

Tuesday, January 19, 2010
Someday?
If I were to dream about what students at my school should be able to do with technology someday, it would look something like what this 7th grade student is doing right now. After watching this video you’ll see that this student is using, almost exclusively, free tools that are available online. Most of the tools she uses require her to have her own e-mail, something we have not trusted our students with yet. Many of the sites and tools she uses are also blocked at my school. It’s seems clear that rather than blocking anything that might possibly be misused, her school has trusted her and granted her freedom to use these tools for learning. It also seems clear that her teachers have modeled and taught her responsible Internet use and encouraged her to take charge of her own learning. She understands what is appropriate for school and what should be used at home and realizes that the freedom she has been given should not be taken for granted. As she works, the idea of citing resources and giving credit for other people’s work seems almost automatic. For her, learning is fun and she seems inspired to follow her curiosity - extending her learning beyond the curriculum.
Thanks Jim Gates for posting this on your blog and @GDhuyvetter for sharing this on Twitter this morning. You got this video stuck in my head - shining a light on where I am and showing me how much farther I still have to go. We'll get there...someday.
Thanks Jim Gates for posting this on your blog and @GDhuyvetter for sharing this on Twitter this morning. You got this video stuck in my head - shining a light on where I am and showing me how much farther I still have to go. We'll get there...someday.
Saturday, November 07, 2009
Collaborative Maps Update
In my last post I mentioned that, " I'd still like to see a SHARE button on Google Maps." Today I noticed that when I go to My Maps, I see a "collaborate" link at the top.

Clicking on it will let you invite others to collaborate with you on your map.

I'm not sure how long that feature has been there. (It was probably already there when I wrote my last post.) For now I'll just fool myself into thinking that Google liked my idea and decided to add this feature because of me. :)
It's worth noting that collaborating on a custom Google Map still requires users to register for a Google Account, something that requires an e-mail. If you'd like your students to be able to work together on a map without having to register for a Google Account, Linda Dierks suggests ScribbleMaps.


Clicking on it will let you invite others to collaborate with you on your map.

I'm not sure how long that feature has been there. (It was probably already there when I wrote my last post.) For now I'll just fool myself into thinking that Google liked my idea and decided to add this feature because of me. :)
It's worth noting that collaborating on a custom Google Map still requires users to register for a Google Account, something that requires an e-mail. If you'd like your students to be able to work together on a map without having to register for a Google Account, Linda Dierks suggests ScribbleMaps.
Thanks for the idea Linda.
As an alternate way to have students collaborate on maps, I've been using Scribble Maps (http://scribblemaps.com). It gives many of the same features Google Maps can without having to set up forms. You can save the map you create to a unique URL and password (still no ID needed) and share it with others. They can save changes as long as they have the correct URL and password.

Sunday, October 04, 2009
Collaborative Maps
Ever sit around playing with a particular web tool and say, "This is great, but there's got to be a way to...(insert your idea here)." This particular question has been rolling around in my head regarding Google Maps. I LOVE Google Maps, but have been frustrated that I haven't found an easy way to create maps collaboratively. I know I can share Google Docs and have multiple people working on the same document, presentation, or spreadsheet, so why can't I do the same with maps? I was ready to write a blog post today pleading with Google to add a SHARE button to Google Maps when I was reminded of a tool that Andy Losik shared with me last spring.
There IS a way for my students contribute placemarks to a Google Map. A way that doesn't require them to use my login, or even have a Google account. Here's what you do:
Details
To set up your Google Form, you need to know that Map A List determines location using the following fields:
You'll then want to add three additional fields for the placemark information.
Once your form is done and you've started collecting information, go to Map A List and sign-up for an account. After that, you'll need to give Map A List authorization to access your Google Spreadsheet. Once that is done you can start creating your map. It's a simple step by step process.
Select the spreadsheet that contains your map data.
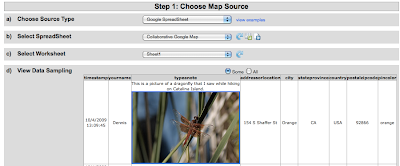
Match the fields in your spreadsheet to the ones that Map A List uses to create your placemarks.
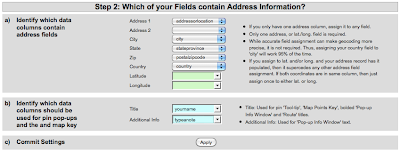
Once that is done, Map A List will check to see how many locations it can find based on the information in your spreadsheet. It does a surprisingly good job of determining locations even with incomplete information.
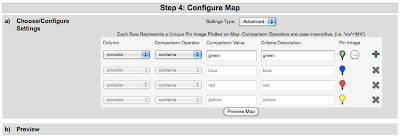
If you added a field that determines what type of placemark to use, the advanced feature on the next step is where you enter that information.
The last step is where you save your map and set a few final options. If you want to be able to send a link to your map to others or embed it on your web page or blog, you'll need to make it public.
Here's a link to the Google Map I created with my form. If you added data to the form, it may take a while to appear on the map. I set mine to update automatically, but noticed that sometimes I need to go in to Map A List and tell it to update the map manually if I want to see new data added the spreadsheet.
Classroom Applications
Students can participate in this type of collaborative map by...
Add lines? Highlight regions? Draw shapes? I haven't figured these out yet. If you have any ideas please share them.
By the way Google, this does not let you off the hook. I'd still like to see a SHARE button on Google Maps.
There IS a way for my students contribute placemarks to a Google Map. A way that doesn't require them to use my login, or even have a Google account. Here's what you do:
- Create a Google Form - Students will use this form to enter their placemark information. This will put their information into a Google Spreadsheet. No login required. They just need a link to the form.
- Use Map A List (www.mapalist.com) to auto-generate a Google Map that's linked to your spreadsheet.
Details
To set up your Google Form, you need to know that Map A List determines location using the following fields:
- Address 1
- Address 2
- City
- State
- Zip
- Country
- Latitude*
- Longitude*
You'll then want to add three additional fields for the placemark information.
- Title - What appears for the title of the placemark.
- Additional Info - What appears as the text in the popup window. This field will also accept HTML code. So any code you can copy & paste into Google Maps will work here too.
- Placemark Symbol Identifier (optional) - This could be a multiple choice item in that your students use to select what type of placemark they want.
Once your form is done and you've started collecting information, go to Map A List and sign-up for an account. After that, you'll need to give Map A List authorization to access your Google Spreadsheet. Once that is done you can start creating your map. It's a simple step by step process.
Select the spreadsheet that contains your map data.

Match the fields in your spreadsheet to the ones that Map A List uses to create your placemarks.

Once that is done, Map A List will check to see how many locations it can find based on the information in your spreadsheet. It does a surprisingly good job of determining locations even with incomplete information.
If you added a field that determines what type of placemark to use, the advanced feature on the next step is where you enter that information.

The last step is where you save your map and set a few final options. If you want to be able to send a link to your map to others or embed it on your web page or blog, you'll need to make it public.
Here's a link to the Google Map I created with my form. If you added data to the form, it may take a while to appear on the map. I set mine to update automatically, but noticed that sometimes I need to go in to Map A List and tell it to update the map manually if I want to see new data added the spreadsheet.
Classroom Applications
Students can participate in this type of collaborative map by...
- Mapping Birthplaces. It could be their own, or someone else's. Our 5th grade is working on immigrant reports right now. This would be a fun way to share their information.
- Historical Places. Students could work together on a class project locating and posting information about historical places around their state or country.
- What's The Weather Today? Classes from several different schools could pick a day and share the weather. They could even embed a picture of what it looks like outside.
- Breakfast Around the World. The form could be shared with as many people as possible to find out what people around the world eat for breakfast. Hmmmm. This idea sounds familiar.
- I'm sure you can think of other ideas...
Add lines? Highlight regions? Draw shapes? I haven't figured these out yet. If you have any ideas please share them.
By the way Google, this does not let you off the hook. I'd still like to see a SHARE button on Google Maps.
Thursday, September 17, 2009
Summer Reflections 2
Fun With Time-Lapse
In addition to digging into Google Maps, this summer was also an opportunity to explore the world of photography. I haven't owned an SLR camera since my old 35mm Canon T70 died back in the early 90's. Things have changed a lot and my new Nikon D5000 has some pretty impressive features. For those you hardcore photographers this is just an "entry level DSLR", but for me it was a major step up from the point & shoots I've been using up to now.
 One feature I'm really enjoying is the Interval Timer feature. This allows me to set the camera to take a certain number of pictures at a specific time interval. This is a great way to capture a series of images that can be combined either inside the camera or using video editing software like iMovie, Movie Maker. For example, I was able to capture time-lapse images of storm clouds moving over Lake Powell this summer. To create the sequences below, I put the camera on a tripod and set it to take one picture every 10 seconds for about 60 frames.
The ability to shoot time-lapse has lots of creative possibilities as well as some science applications too. Things to remember:
In addition to digging into Google Maps, this summer was also an opportunity to explore the world of photography. I haven't owned an SLR camera since my old 35mm Canon T70 died back in the early 90's. Things have changed a lot and my new Nikon D5000 has some pretty impressive features. For those you hardcore photographers this is just an "entry level DSLR", but for me it was a major step up from the point & shoots I've been using up to now.
 One feature I'm really enjoying is the Interval Timer feature. This allows me to set the camera to take a certain number of pictures at a specific time interval. This is a great way to capture a series of images that can be combined either inside the camera or using video editing software like iMovie, Movie Maker. For example, I was able to capture time-lapse images of storm clouds moving over Lake Powell this summer. To create the sequences below, I put the camera on a tripod and set it to take one picture every 10 seconds for about 60 frames.
The ability to shoot time-lapse has lots of creative possibilities as well as some science applications too. Things to remember:
- Make sure the camera doesn't move while you're capturing images. After seeing the results of my first few attempts, I learned that it was better to set the tripod on the ground because the houseboat moves.
- Don't use the maximum resolution of your camera. You don't need a 3000 x 4000 pixel image if you're making a video. Besides, you'll fit a lot more on your memory card if you scale it back a little. The best HD video resolution is only 1920 X 1080.
- Make sure you have a full battery charge or, if you have an AC adapter, plug your camera into a power source. A lot of time can be wasted if your camera dies during your interval shoot.
- Experiment & have fun. Just like the Hokey Pokey - "That's what it's all about."
Tuesday, September 08, 2009
Summer Reflections
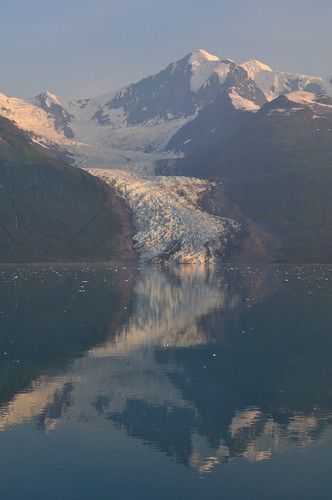
Many of you start a new school year today. In just a moment students will be arriving, anxiously waiting for the pearls of wisdom you choose to bestow upon them. Like me, many of you are probably wondering how summer went by so fast. It seems so close, yet as you frantically put those finishing touches on your classroom, it also seems infinitely far away. It wasn't that long ago, I think it was July, that I was in Alaska exploring Denali National Park and cruising the Inside Passage. When I get stressed about everything on my "to-do" list it helps to go back and re-live that adventure. It puts me back in my "happy place".
Because I consider myself a bit of a techie, I used the trip as an opportunity to dig in and really get familiar with Google Maps. Below is my Alaska Adventure.
View Alaska Adventure in a larger map
Creating a Google Map is a wonderful way to combine stories, pictures, and video from your vacation. I was able to arrange events in order, map my travel route, and place pictures and videos in their proper place on the map. It's like an interactive travelogue. And sharing my travel story is as simple as copying and pasting a link into an e-mail (or blogpost).
When editing a "story" events can be rearranged by simply dragging them up and down the list on the right side of your screen. Lines can be added to show travel routes. One feature I really liked was Google Maps ability to make lines follow known roads or highways. (I don't even think you can do this in Google Earth.)

I had no problem adding photos I had posted to my Flickr account. In the "rich text" editor you just click on image button and paste the URL.

Google Maps will also accept some embed code. Using the "Edit HTML" feature, I was able to copy and paste code to embed video clips I posted to YouTube. Since Google owns YouTube it makes sense that this would work. I did not have any luck trying to embed something from Voicethread however. It may take some experimenting to see what it will and will not accept.

As you can imagine there are lots of possibilities for using Google Maps in the classroom. Maps are a great way for students to grasp large amounts of data in a way that isn't overwhelming. Here's one that shows recent earthquakes around the world (earthquakes.tafoni.net). Do you think your students could use this information to locate the boundaries of tectonic plates? If your class is looking at current events, the LA Times has one with updated info about the Station Fire.
You can also get students involved in creating Google Maps. In an earlier post I showed a "Breakfast Around the World" map created with data collected from our 3rd graders. Colette Cassinelli created a project she uses with her students called "Postcard Geography". I can see our 5th grade teachers doing something similar for combining information from students' state reports. (Colette also has some great Google Map links on her wiki.)
One hurdle you need jump when using maps with students is that Google Maps is not part of Google Apps for Education. So in order for students to edit a map or create their own, they need to register with Google and create their own Google account, or use one created by their teacher. Otherwise the teacher will have to take work submitted by students and post it to Google themselves. (That's what I've done.) Hopefully this is something Google will add to Apps for Ed in the future.
Enjoy playing with Google Maps and if the new school year gets a little overwhelming, take a time out, think back to summer and map your summer memories. I think I 'm going back and look at some Alaska pictures right now.
Monday, June 15, 2009
Listening with Their Eyes
"These kids just don't listen!"
You may not have said it out loud, but you know you've thought it. Sometimes it seems like the words we say just bounce right off. You might as well be talking to a wall.
It's true. There are times when kids don't hear a word we say, but that doesn't mean they're not listening. Maybe they're listening with their eyes.
In a recent Sunday sermon, this quote was shared:
You may not have said it out loud, but you know you've thought it. Sometimes it seems like the words we say just bounce right off. You might as well be talking to a wall.
It's true. There are times when kids don't hear a word we say, but that doesn't mean they're not listening. Maybe they're listening with their eyes.
In a recent Sunday sermon, this quote was shared:
I'd rather see a sermon than hear one any day;
I'd rather one should walk with me than merely tell the way.
The eye's a better pupil and more willing than the ear,
Fine counsel is confusing, but example's always clear;
And the best of all the preachers are the men who live their creeds,
For to see good put in action is what everybody needs.
I soon can learn to do it if you'll let me see it done;
I can watch your hands in action, but your tongue too fast may run.
And the lecture you deliver may be very wise and true,
But I'd rather get my lessons by observing what you do;
For I might misunderstand you and the high advise you give,
But there's no misunderstanding how you act and how you live.
excerpt from 'Sermons We See' by Edgar Guest
When you stand in front of your students what are you telling them? On those rare times they they do listen with their ears, does the message they hear conflict with the one they receive with their eyes?
Like it or not, when they're looking at us they're learning more than just the curriculum. The lessons they learn with their eyes are lessons in character. These lessons are taught continuously and unconsciously - both in and outside the classroom.
Our actions can be a powerful teaching tool when we SHOW our students what to do rather than just telling them. Think about it. When we use our words to say, "This is important." Do our deeds back it up?
Look at the way we teach information literacy and digital citizenship. When we tell kids to go find information on the Internet, do we also model good search techniques in class? Do we demonstrate how to evaluate information for accuracy or bias? We tell them to be sure to respect copyright and to cite ALL their resources for papers & projects, but do we take the time to do the same for our presentations & lectures?
We emphasize good digital citizenship and encourage students to protect themselves online. We warn them that what they post can come back to hurt them later if they are not careful, but do we also exercise those same practices ourselves? Would you want your students to see your Facebook or MySpace page? How would you feel if they started following you on Twitter?
Maybe Charles Barkley isn't, but we are. We chose to be when we made the choice to become teachers - I think Teach42 would back me up on this. The students in our room are watching to see if the words they hear from us are more than just hype.
Now I've made a personal choice not to "friend" my students on Facebook and as far as I know none follow me on Twitter, but if by chance one of them happens to see my profile or read my tweets, there's nothing there that should cause me to feel shame or regret. I believe we need to be role models to our students in the way we act in public and online. This doesn't mean we have to be perfect - kids see through that facade right away. It just means we have to be real and make sure that our words and our actions are not sending mixed messages.
When you stand in front of your students what are you telling them? On those rare times they they do listen with their ears, does the message they hear conflict with the one they receive with their eyes?
Like it or not, when they're looking at us they're learning more than just the curriculum. The lessons they learn with their eyes are lessons in character. These lessons are taught continuously and unconsciously - both in and outside the classroom.
Our actions can be a powerful teaching tool when we SHOW our students what to do rather than just telling them. Think about it. When we use our words to say, "This is important." Do our deeds back it up?
Look at the way we teach information literacy and digital citizenship. When we tell kids to go find information on the Internet, do we also model good search techniques in class? Do we demonstrate how to evaluate information for accuracy or bias? We tell them to be sure to respect copyright and to cite ALL their resources for papers & projects, but do we take the time to do the same for our presentations & lectures?
We emphasize good digital citizenship and encourage students to protect themselves online. We warn them that what they post can come back to hurt them later if they are not careful, but do we also exercise those same practices ourselves? Would you want your students to see your Facebook or MySpace page? How would you feel if they started following you on Twitter?
"I'm no role model" - Charles Barkley
Maybe Charles Barkley isn't, but we are. We chose to be when we made the choice to become teachers - I think Teach42 would back me up on this. The students in our room are watching to see if the words they hear from us are more than just hype.
Now I've made a personal choice not to "friend" my students on Facebook and as far as I know none follow me on Twitter, but if by chance one of them happens to see my profile or read my tweets, there's nothing there that should cause me to feel shame or regret. I believe we need to be role models to our students in the way we act in public and online. This doesn't mean we have to be perfect - kids see through that facade right away. It just means we have to be real and make sure that our words and our actions are not sending mixed messages.
And all travelers can witness that the best of guides today
Is not the one who tells them, but the one who shows the way
another excerpt from 'Sermons We See' by Edgar Guest
Read the entire poem here.
Read the entire poem here.
Sunday, June 07, 2009
The Final Frontier
Here's another one of those serendipity moments.
 A weekend fishing trip up to the Owens Valley yielded an unexpected surprise. If you've ever driven up US 395 you may have noticed those large radio telescopes off to the east between Big Pine & Bishop, CA. For years I've wondered about those and have always wanted to get a closer look and learn more about them. What I never knew, is that 13 miles east of there, tucked up in the hills is another similar array.
Here's the serendipitous part - the day we picked to fish the Owens River just happened to be the same day that CARMA (The Combined Array for Research in Millimeter wave Astronomy) was holding their annual Open House. We followed the signs along the highway, headed east on highway 168 past the big dishes in the valley up into the White Mountains, and found the observatory site and it's 23 "telescopes".

Upon arriving we were greeted by Dr. Mark Hodges from Caltech who started the tour by sharing some information about the array and some of the work being done there. While not as big as the 130 ft dishes in the valley, what these telescopes lack in size, they make up in quantity and precision. The 10 and 3.5 meter dishes here are practically perfect parabolas - the margin of error is about the width of a human hair. By using an array of telescopes they are effectively able to get the same information that could be obtained by a much larger dish. As we toured the facility, Douglas, one of the engineers explained how the racks of computers he designed process terabytes of information received from the array, filter out the noise, and combine it into one "image".
 Why take a picture with radio waves?
After munching on free hot dogs provided by the CARMA staff, Eric, one of several astrophysicists on site, explained that while the Hubble Telescope provides stunning visual images, it doesn't give us the whole picture. Radio waves provide much more information about distant stars & galaxies and help scientists determine not just what they look like, but also identify the molecules that make up these distant objects. Also, because radio waves are not affected by visible light, these telescopes can be used 24 hours a day.
What type of research is being done here?
When I asked Eric about his project, he shared that he currently has the 3.5 meter array pointed at a cluster of galaxies and hopes to use the information he gathers to prove the existence of dark matter.
 The CARMA array is funded by the National Science Foundation and is a jointly operated by Caltech, UC Berkeley, the University of Illinois, the University of Maryland, and the University of Chicago. Every 6 months, the NSF accepts research proposals and determines which ones get time to use the array. The allocation of time is a valuable thing because a single "picture" taken by the array can take take several hours. Douglas, one of the CARMA engineers, explained that to get one image, an array of telescopes captures lines of information as the Earth rotates. After about 8 hours these lines create a complete circle and the computers get to work to process the image. "It's like the world's slowest digital camera."
That's me standing next to one of the 10 meter telescopes.
For more information about CARMA, visit their site: www.mmarray.org
 A weekend fishing trip up to the Owens Valley yielded an unexpected surprise. If you've ever driven up US 395 you may have noticed those large radio telescopes off to the east between Big Pine & Bishop, CA. For years I've wondered about those and have always wanted to get a closer look and learn more about them. What I never knew, is that 13 miles east of there, tucked up in the hills is another similar array.
Here's the serendipitous part - the day we picked to fish the Owens River just happened to be the same day that CARMA (The Combined Array for Research in Millimeter wave Astronomy) was holding their annual Open House. We followed the signs along the highway, headed east on highway 168 past the big dishes in the valley up into the White Mountains, and found the observatory site and it's 23 "telescopes".

Upon arriving we were greeted by Dr. Mark Hodges from Caltech who started the tour by sharing some information about the array and some of the work being done there. While not as big as the 130 ft dishes in the valley, what these telescopes lack in size, they make up in quantity and precision. The 10 and 3.5 meter dishes here are practically perfect parabolas - the margin of error is about the width of a human hair. By using an array of telescopes they are effectively able to get the same information that could be obtained by a much larger dish. As we toured the facility, Douglas, one of the engineers explained how the racks of computers he designed process terabytes of information received from the array, filter out the noise, and combine it into one "image".
 Why take a picture with radio waves?
After munching on free hot dogs provided by the CARMA staff, Eric, one of several astrophysicists on site, explained that while the Hubble Telescope provides stunning visual images, it doesn't give us the whole picture. Radio waves provide much more information about distant stars & galaxies and help scientists determine not just what they look like, but also identify the molecules that make up these distant objects. Also, because radio waves are not affected by visible light, these telescopes can be used 24 hours a day.
What type of research is being done here?
When I asked Eric about his project, he shared that he currently has the 3.5 meter array pointed at a cluster of galaxies and hopes to use the information he gathers to prove the existence of dark matter.
 The CARMA array is funded by the National Science Foundation and is a jointly operated by Caltech, UC Berkeley, the University of Illinois, the University of Maryland, and the University of Chicago. Every 6 months, the NSF accepts research proposals and determines which ones get time to use the array. The allocation of time is a valuable thing because a single "picture" taken by the array can take take several hours. Douglas, one of the CARMA engineers, explained that to get one image, an array of telescopes captures lines of information as the Earth rotates. After about 8 hours these lines create a complete circle and the computers get to work to process the image. "It's like the world's slowest digital camera."
That's me standing next to one of the 10 meter telescopes.
For more information about CARMA, visit their site: www.mmarray.org
Thursday, June 04, 2009
A Simple Solution?
Back in November 2007 I posted a "Not So Simple Solution" demonstrating a fairly complicated way to take projects created in Microsoft PhotoStory3 and make them viewable on Macs.
While brainstorming a way to share our 3rd grade Animal Riddles online (thanks Jennifer Gingerich for the project idea) I tried uploading the wmv files created by PhotoStory directly into Voicethread - AND IT WORKED!
Now we can not only share our students' PhotoStory projects, but putting them on Voicethread allows us the option to let others comment back. Nice!
Below is an example. (Until I get an OK from the teacher I've turned off commenting.)
While brainstorming a way to share our 3rd grade Animal Riddles online (thanks Jennifer Gingerich for the project idea) I tried uploading the wmv files created by PhotoStory directly into Voicethread - AND IT WORKED!
Now we can not only share our students' PhotoStory projects, but putting them on Voicethread allows us the option to let others comment back. Nice!
Below is an example. (Until I get an OK from the teacher I've turned off commenting.)

Monday, May 04, 2009
If Oprah Can Do It...
This might just be my shortest blog post ever, but sometimes a good idea doesn't have to be complicated. At the San Gabriel Valley CUE Technology Fair last Saturday, Jen Wagner passed on this idea she heard from Hall Davidson. Now I'm passing it on to you. (Care to keep the thread going?)
If you're looking for a free way send a message blast out to parents, rather than pay for an expensive phone/text message system, why not do what they do at Forsyth County Schools in Georgia and use Twitter? Just create a Twitter account (FREE) for your school and encourage all parents to follow it. Parents can use a Twitter app on their computer or phone or set up their account to alert them via SMS text message whenever your office sends out a message.
Parents follow the school's Twitter updates, but the school does not follow or reply to anyone. It’s simply used as a way to broadcast events and emergencies.
I’m sure Twitter messages from your school would be much more useful and meaningful than those from Oprah or Ashton Kutcher.
Did I mention it’s free?
If you're looking for a free way send a message blast out to parents, rather than pay for an expensive phone/text message system, why not do what they do at Forsyth County Schools in Georgia and use Twitter? Just create a Twitter account (FREE) for your school and encourage all parents to follow it. Parents can use a Twitter app on their computer or phone or set up their account to alert them via SMS text message whenever your office sends out a message.
Parents follow the school's Twitter updates, but the school does not follow or reply to anyone. It’s simply used as a way to broadcast events and emergencies.
I’m sure Twitter messages from your school would be much more useful and meaningful than those from Oprah or Ashton Kutcher.
Did I mention it’s free?
Thursday, April 02, 2009
It's All About the Network
Have you seen those Verizon commercials that have hundreds of support people standing behind their wireless phone user? The idea is to let you know that you're not alone, that you've got people behind you to keep you connected. Their slogan - It's all about the network. That's how I felt about MY network this week.
On Tuesday morning I worked with one of our third grade classes. They had just read the book "George Washington's Breakfast" by Jean Fritz. Our idea was to create a little form, asking the world what they ate for breakfast. I opened up a new form in Google Docs and had the kids help write the survey description and questions. Then I posted a link to the form on Twitter and Plurk asking you to show them the power of our network.
The results were practically instantaneous. Within 15 minutes we had a dozen responses. By that evening there were over a hundred. When I checked the next morning there were almost 400! Most were from the US, but we also had responses from Australia, New Zealand, Japan, Scotland, Italy, China, Singapore, Korea, and Brazil!
I thought it would be fun to add the responses to a Google Map, so I started copying and pasting what people ate into placemarks. I had to stop after the first 200. I just couldn't keep up with the responses.
View Larger Map
We're still working on what we're going to do with all the data, but if you'd like to share our project with your students, here is a link to our spreadsheet. (As I write this, we're up to 469 responses.)
I'd like to thank all those who contributed to the survey and passed it on to others. The kids had a blast watching the results come in. We were all amazed by the huge response. Our network ROCKS!
On Tuesday morning I worked with one of our third grade classes. They had just read the book "George Washington's Breakfast" by Jean Fritz. Our idea was to create a little form, asking the world what they ate for breakfast. I opened up a new form in Google Docs and had the kids help write the survey description and questions. Then I posted a link to the form on Twitter and Plurk asking you to show them the power of our network.
The results were practically instantaneous. Within 15 minutes we had a dozen responses. By that evening there were over a hundred. When I checked the next morning there were almost 400! Most were from the US, but we also had responses from Australia, New Zealand, Japan, Scotland, Italy, China, Singapore, Korea, and Brazil!
I thought it would be fun to add the responses to a Google Map, so I started copying and pasting what people ate into placemarks. I had to stop after the first 200. I just couldn't keep up with the responses.
View Larger Map
We're still working on what we're going to do with all the data, but if you'd like to share our project with your students, here is a link to our spreadsheet. (As I write this, we're up to 469 responses.)
I'd like to thank all those who contributed to the survey and passed it on to others. The kids had a blast watching the results come in. We were all amazed by the huge response. Our network ROCKS!
Sunday, March 01, 2009
Morsels from NCCE
 Okay, I have to admit I'm a little jealous of people who can attend a conference or workshop and by the time it is over they've already written and posted a clean, coherent, and thoughtful blog recap of what was learned and experienced. For me it takes some time to process all that has been received, and even then it's often difficult to put pen to paper (or text to screen). Maybe that's why I have such great respect for experienced edubloggers like Wes Fryer.
Even so, it has been a week since I returned from Portland, Oregon and the NCCE Conference, and while it may not be as timely as some bloggers, here are a few morsels that fed my brain last week.
Peer Coaching
This idea of training a team of teachers to design and implement technology rich, standards-based lessons, and then sending them out to coach and train others at their school is nothing new. It keeps the focus where it should be - on the students and the teachers, not the computers and the technology. It makes sure that technology is not used for technology's sake, but rather with a real learning goal in mind.
In my practice at school, I've realized that staff in-services once or twice a year are not nearly as effective as working one-on-one or in small groups to provide "just in time" learning. When a teacher learns how to use a specific tech tool that engages students and helps them achieve a specific learning goal with greater understanding and retention, that teacher sees the value of that tool for learning. Better yet, as that teacher becomes proficient using that tool, they can help their colleagues learn it too.
In Washington state they've formalized the process of peer coaching with the help of grants from Microsoft and peer coaching facilitator training through the Puget Sound Center. I think a program like this could really benefit our schools and districts here in Orange County.
In my previous post I shared one example of how this type of mentoring works in the Bend/LaPine School District. I'm really impressed with the work done by these "cadres" of teachers to energize their lessons with technology. Besides I think it just sounds cool to part of a "cadre". I want to be part of a cadre, or maybe I'll join an "EdTech Posse". What do you think?
Mobile Technology in the Classroom
From Karen Fasimpaur I learned about "Using Mobile Technology to Differentiate Instruction" and how podcasts, vodcasts, Palms, cell phones, netbooks, and ebooks can be used to engage students and motivate them to learn. I also got a chance to get my hands on Amazon's Kindle e-book reader. I know I keep saying it's about the learning and not the thing, but I SO want one of these now. (Is that wrong?)
ISTE's Classroom Observation Tool
Want to see if technology rich lessons and projects are really helping your students? Download this free tool from ISTE to use as you observe in the classroom. You can use it offline, but data is uploaded to ISTE's secure server so you can access it from different computers and generate various reports. I asked if ISTE intends to use this data for their own purposes, but was told, "No, they just store it. They don't use it." With that in mind, if you use this tool, you still might want to be careful to keep your observations clear of specific names and keep them limited to "just the facts". I can definitely see benefits to using this tool to record and report the effectiveness of instruction. Now if only ISTE would update it with the 2007 NETS for Students rather than the 1998 version.
Northwest Tech Teacher of the Year
What a pleasure it was to see my friend and fellow DEN STAR, Martha Thornburgh awarded the Northwest Tech Teacher of the Year award. It's always nice to see someone you know and respect honored for the great job they're doing. Way to go Martha! If you get a chance, be sure to check out her "Give Math a Voice" presentation and Voicethread.

Blog author with Northwest Tech Teacher of the Year, Martha Thornburgh, and StormChaser Reed Timmer. Photo courtesy of Martha Thornburgh.
Storm Chaser
The DEN came through for me again, this time giving me and other Discovery Educators an opportunity to meet and talk with Reed Timmer of StormChasers. His passion for science, math, and meteorology is demonstrated in his fascination for getting up close and personal with tornadoes and other violent storms. I was also surprised to learn that in addition to storm chasing, he's also working on his PhD! Is this guy brilliant or totally nuts? Perhaps a little of both. Thanks Reed for inspiring my students, and thanks Discovery for this wonderful opportunity!
Wednesday, February 18, 2009
Bigger Isn't Always Better
ITSC is small compared to other state or regional conferences - only about 400 attendees - but I really like how they put it together. The three hour workshops really encourage conversation and allow time for reflection. It's also a great opportunity to hear and interact with some pretty amazing presenters on a more intimate level. Having access to these presenters both during and outside of their sessions is a real treat and facilitates some great conversations.
Speaking with Jennifer Arns, the Program Director, I learned that at ITSC they really want schools and districts to attend in teams and they provide teams with time to meet and discuss what has been learned periodically throughout the conference. This time to process what has been learned and brainstorm how it can be applied is quite valuable and unfortunately pretty unique in educational conferences. The fact that they can actually get this many teachers to take their President's Day weekend to attend speaks to the importance these educators place on using technology tools to improve instruction.
Here are some thoughts from sessions and conversations:
Cell Phone Digital Storytelling - Wes Fryer
I've created podcasts from my cell phone using GCast, but another tool called Gabcast adds the ability to post from not just MY cell phone, but ANY phone.

With this tool, teachers can create multiple channels for different classes, then give students the phone number and access code so they can just call in and record their thoughts & stories, posting them to the class podcast. At our tables we brainstormed how this could transform a class field trip by directing students to use their cell phones to take pictures at certain locations and record and post their thoughts on what they see, what they experience, and what they learn. These images and audio files are captured "on location", and can later be combined into digital stories using any number of media tools.
The best part? There's no need for the school to supply students with expensive camera or recording equipment, most already have what they need to collect their stories.
Historical Documentaries - Jennifer Gingerich
Using familiar tools like PhotoStory3, iMovie, and GarageBand, students take "digital kits" and use them to create documentaries from periods in history. Jennifer worked with our group to create a pretty impressive Ellis Island story in just a matter of minutes. She also shared student created Oregon Trail diaries. These documentaries are written in first person, using images from the kit, or photos taken of students in costume with a sepia tone effect to give an "antique" look.
The digital kits contain music, photos, citations and other components needed to create the stories. For the students, the focus is not on teaching them how to find pictures or make videos, but seeing how well they know the content and can tell a story. The emphasis is on writing and historical accuracy. The advantage of digital stories over a written report? Stories not only capture the facts of the time period, but give kids an opportunity to put themselves in the place of these people and consider what they must have thought and how they must have felt - connecting them to the history on an emotional level rather than just a factual one.
Wii Whiteboard - John Sperry
I've seen Johnny Lee's video on YouTube, but here I got to actually see, feel, and try it out for myself. John Sperry from Springfield, Oregon demonstrated how easy and inexpensive it is to make your own interactive whiteboard using a Wii Remote. Time to dust off my soldering iron and go into project mode. I may have to take John up on his offer and send him a empty Expo marker so he can transform it into an infra-red pen.
Bend/LaPine School District - Amy Lundstrom
Amy Lundstrom is a technology program developer for Bend/LaPine School District. She's also the one that suggested I take an extra day or two to attend this conference. I'm so glad she did.
Speaking with her between conference workshops I learned how she is working with teams of teachers in her district, facilitating development of standards-based lessons that integrate technology. One unusual thing they do is give teachers an opportunity to observe their own class during one of these lessons. Through this "Lesson Study" program, members of these teams take turns teaching and observing each other's classes. The purpose of these observations is to determine 1) Do all students have access to the content being taught? 2) Did technology help students acheive the standard? In addition to observing the whole class, the classroom teacher can identify specific students in their own class to be observed. Observers are directed to be "human video cameras" noting how these students act during class and determining if those actions indicate motivation. After class, these students' work product is also evaluated. This program gives classroom teachers a unique insight into how particular students are affected by these newly developed lessons and technology tools. Ultimately it helps these teachers become more comfortable and confident planning and implementing technology infused lessons with their classes.
Speaking with Jennifer Arns, the Program Director, I learned that at ITSC they really want schools and districts to attend in teams and they provide teams with time to meet and discuss what has been learned periodically throughout the conference. This time to process what has been learned and brainstorm how it can be applied is quite valuable and unfortunately pretty unique in educational conferences. The fact that they can actually get this many teachers to take their President's Day weekend to attend speaks to the importance these educators place on using technology tools to improve instruction.
Here are some thoughts from sessions and conversations:
Cell Phone Digital Storytelling - Wes Fryer
I've created podcasts from my cell phone using GCast, but another tool called Gabcast adds the ability to post from not just MY cell phone, but ANY phone.

With this tool, teachers can create multiple channels for different classes, then give students the phone number and access code so they can just call in and record their thoughts & stories, posting them to the class podcast. At our tables we brainstormed how this could transform a class field trip by directing students to use their cell phones to take pictures at certain locations and record and post their thoughts on what they see, what they experience, and what they learn. These images and audio files are captured "on location", and can later be combined into digital stories using any number of media tools.
The best part? There's no need for the school to supply students with expensive camera or recording equipment, most already have what they need to collect their stories.
Historical Documentaries - Jennifer Gingerich
Using familiar tools like PhotoStory3, iMovie, and GarageBand, students take "digital kits" and use them to create documentaries from periods in history. Jennifer worked with our group to create a pretty impressive Ellis Island story in just a matter of minutes. She also shared student created Oregon Trail diaries. These documentaries are written in first person, using images from the kit, or photos taken of students in costume with a sepia tone effect to give an "antique" look.
The digital kits contain music, photos, citations and other components needed to create the stories. For the students, the focus is not on teaching them how to find pictures or make videos, but seeing how well they know the content and can tell a story. The emphasis is on writing and historical accuracy. The advantage of digital stories over a written report? Stories not only capture the facts of the time period, but give kids an opportunity to put themselves in the place of these people and consider what they must have thought and how they must have felt - connecting them to the history on an emotional level rather than just a factual one.
Wii Whiteboard - John Sperry
I've seen Johnny Lee's video on YouTube, but here I got to actually see, feel, and try it out for myself. John Sperry from Springfield, Oregon demonstrated how easy and inexpensive it is to make your own interactive whiteboard using a Wii Remote. Time to dust off my soldering iron and go into project mode. I may have to take John up on his offer and send him a empty Expo marker so he can transform it into an infra-red pen.
Bend/LaPine School District - Amy Lundstrom
Amy Lundstrom is a technology program developer for Bend/LaPine School District. She's also the one that suggested I take an extra day or two to attend this conference. I'm so glad she did.
Speaking with her between conference workshops I learned how she is working with teams of teachers in her district, facilitating development of standards-based lessons that integrate technology. One unusual thing they do is give teachers an opportunity to observe their own class during one of these lessons. Through this "Lesson Study" program, members of these teams take turns teaching and observing each other's classes. The purpose of these observations is to determine 1) Do all students have access to the content being taught? 2) Did technology help students acheive the standard? In addition to observing the whole class, the classroom teacher can identify specific students in their own class to be observed. Observers are directed to be "human video cameras" noting how these students act during class and determining if those actions indicate motivation. After class, these students' work product is also evaluated. This program gives classroom teachers a unique insight into how particular students are affected by these newly developed lessons and technology tools. Ultimately it helps these teachers become more comfortable and confident planning and implementing technology infused lessons with their classes.
Tuesday, February 17, 2009
The Joy is in the Journey
It's nice sometimes to take a day or two get away and clear your head. Riding the Coast Starlight last weekend from LA to Portland for ITSC and NCCE was my chance to do a mental shut down and restart, clearing out some brain space for the massive information download I'd be experiencing at these back to back conferences.
The 30 hour rail journey was just that. Even though I brought reading material I spent most of the time just staring out the window. Saturday the train hugged the California coast up to San Luis Obispo then headed inland through lush green hills toward Paso Robles, then north to San Jose, Oakland, and over to Sacramento. Sunday morning I woke up to snow flurries as we crossed into Oregon. Passing Klamath Falls the train chugged up into Cascades toward Cascade Pass (about 5000 ft) and eventually down to Eugene. From there it was a straight shot up the Willamette Valley to Portland.
Some Random Observations from the journey:
During my rail trip last summer (see Amtrak Adventure blog post from July '08) I lamented the fact that I was unable to get Internet access on the train. This time I was armed with my Blackberry and it's 3G connection to keep me in touch with my twitter & plurk friends. This also allowed me to post pictures, videos, and even do a couple of Skype video chats from my compartment. The laptop tethering worked great when I was able to get a cell phone signal. (See photo slide show and video below.)
Arriving at Portland Union Station late Sunday afternoon I hopped on the MAX light rail to the ITSC Conference at the Portland Airport Sheraton. With work 1000 miles away and my head clear it's time to do some learning. Let the conversations begin.
The 30 hour rail journey was just that. Even though I brought reading material I spent most of the time just staring out the window. Saturday the train hugged the California coast up to San Luis Obispo then headed inland through lush green hills toward Paso Robles, then north to San Jose, Oakland, and over to Sacramento. Sunday morning I woke up to snow flurries as we crossed into Oregon. Passing Klamath Falls the train chugged up into Cascades toward Cascade Pass (about 5000 ft) and eventually down to Eugene. From there it was a straight shot up the Willamette Valley to Portland.
Some Random Observations from the journey:
- A dozen deer leaping through the hills outside Santa Barbara
- 12 foot surf crashing along the coast near Pt. Conception
- several startled cattle scrambling ungracefully away from the train as we climbed out of San Luis Obispo
- Rolling hills near Paso Robles turned a velvety green from recent rain storms
- Sipping coffee early Sunday morning in the Parlor car, watching the wind & snow swirling outside through the Shasta/Trinity National Forest
- peeking through snow covered evergreens at the view of Odell Lake climbing up toward Cascade Pass
- Clear blue skies and views of Mt. Hood outside Salem. (Oregonians would say, "The mountains are out today.")
During my rail trip last summer (see Amtrak Adventure blog post from July '08) I lamented the fact that I was unable to get Internet access on the train. This time I was armed with my Blackberry and it's 3G connection to keep me in touch with my twitter & plurk friends. This also allowed me to post pictures, videos, and even do a couple of Skype video chats from my compartment. The laptop tethering worked great when I was able to get a cell phone signal. (See photo slide show and video below.)
Arriving at Portland Union Station late Sunday afternoon I hopped on the MAX light rail to the ITSC Conference at the Portland Airport Sheraton. With work 1000 miles away and my head clear it's time to do some learning. Let the conversations begin.
Monday, January 19, 2009
The Art of Sound
Remember that guy, Michael Winslow, from the Police Academy movies? The one who made all those strange sounds with his mouth? How many of you have a student like that in your class? As you walk across the room, this is that special child that makes squeaking noises for every step you take, putting his classmates in hysterics. Few things amuse this kid more than the variety of different sounds made by gas escaping from the human body - and he can reproduce any one of them at will. Rather than strangle this child, maybe it would be better to let this unique individual express his talents in a constructive way.
Sound effects are a big part of creating a dramatic audio podcast. They can take your story and give it depth, creating a rich sound picture for your listeners. A good sound effect can create a picture in someone’s mind much easier than it would be to produce that same image on film or video. This is why I like the simple elegance of the audio podcast. You can create a multi-layered soundscape with relatively little effort or resources. No need for expensive equipment, dangerous stunts, or elaborate sets.
Creating sound effects can be fun. Did you know you can mimic the sound of a crackling fire by slowly crinkling a bag of potato chips? Sliding the lid off of a toilet tank sounds just like someone opening an ancient sarcophagus. Rapidly opening and closing an umbrella sounds like a bat flying. And of course any self-respecting Monty Python fan knows that two hollowed out coconut shells are a prefect substitute for a galloping horse.
With all the attention given to student created video I think we should not forget about the power of audio. An audio podcast project can be a great choice if you don’t have a lot of time or resources. Using free software like Audacity you can record your story, add music and sound effects, and export your show as a podcast friendly mp3 file in just a fraction of the time and effort it would take to do the same project as a video production.
To encourage students and teachers at my school to learn to use audio podcasts, I created an online elective course that teaches them about podcasting and how to use Audacity to create their own podcasts and post them on our system. I’ve also taken many elements of that course and posted them online on my wiki so you can share them with your students and faculty too.
Make Your Own Podcast Wiki
Feel free to use these resources and share them with your students and teachers. If you or your students create some great podcasts as a result, please reply with a link so we can all hear what you’ve done.
Sound effects are a big part of creating a dramatic audio podcast. They can take your story and give it depth, creating a rich sound picture for your listeners. A good sound effect can create a picture in someone’s mind much easier than it would be to produce that same image on film or video. This is why I like the simple elegance of the audio podcast. You can create a multi-layered soundscape with relatively little effort or resources. No need for expensive equipment, dangerous stunts, or elaborate sets.
Creating sound effects can be fun. Did you know you can mimic the sound of a crackling fire by slowly crinkling a bag of potato chips? Sliding the lid off of a toilet tank sounds just like someone opening an ancient sarcophagus. Rapidly opening and closing an umbrella sounds like a bat flying. And of course any self-respecting Monty Python fan knows that two hollowed out coconut shells are a prefect substitute for a galloping horse.
With all the attention given to student created video I think we should not forget about the power of audio. An audio podcast project can be a great choice if you don’t have a lot of time or resources. Using free software like Audacity you can record your story, add music and sound effects, and export your show as a podcast friendly mp3 file in just a fraction of the time and effort it would take to do the same project as a video production.
To encourage students and teachers at my school to learn to use audio podcasts, I created an online elective course that teaches them about podcasting and how to use Audacity to create their own podcasts and post them on our system. I’ve also taken many elements of that course and posted them online on my wiki so you can share them with your students and faculty too.
Make Your Own Podcast Wiki
Feel free to use these resources and share them with your students and teachers. If you or your students create some great podcasts as a result, please reply with a link so we can all hear what you’ve done.
Tuesday, November 25, 2008
Have Internet Will Travel
Maybe I’m getting spoiled, but I find it harder and harder not to gripe and complain when I go to a conference and find out that I can't get online. I can’t say I blame the conference committee for not providing Internet access when the conference center (in this case the Long Beach Convention Center) charges astronomical prices to provide web access in conference rooms. ($600 for a 256K connection, per room!)
This year rather than complaining, I used the lack of connectivity as an opportunity - or should I say excuse - to upgrade my phone to the new Blackberry Storm with it’s Internet tethering capabilities. Since I was presenting I really, really, needed to be able to get online. You understand, right?
So last Friday morning I got up extra early to wait in line at my local Verizon store and was one of the lucky few to get my hands on the new Storm. I’ve had it for a couple days now and still have lots to learn but here are a few first impressions.
It’s Clickable
I know it sounds gimmicky, but I really like the clickable screen. Essentially the whole screen is a big button. You position your finger on the touch screen where you want click and push down. The feedback on a click is really nice, although positioning my fingers on exactly the right place on the screen can be a little tricky.
The onscreen keyboard is really nice too. In landscape mode, you get a full keyboard. In portrait mode you get a half keyboard in which each key has two letters on it. I’m amazed by the interpretive ability of this keyboard to know the words or web sites I’m trying to type.
One annoying feature - when typing numbers you have to click the number key to make the keypad appear. When you type a number it goes back to letters and you have to press the number key again to make the numbers come back up again. This is a pain if you have to type in any number higher than 9.

Tethering
This feature was not an option for me, and Verizon seemed to be the only company that actually didn’t make tethering your laptop to your phone a violation of their terms of service. Although they do charge $15 to turn this feature on for a month. This is one reason I stayed away from the iPhone. I checked online and the only way I could find to tether an iPhone was to jailbreak it and hope that AT&T doesn’t catch you and charge you overages, or cancel your service. I know lots of people do it, but I didn’t want to go that route.
Since I got the phone on Friday and was presenting on Monday, one of the first things I wanted to try when I got home was connecting the phone to my Mac and going online with it. Imagine my dismay when I inserted the CD only to discover that there was NO MAC SOFTWARE!!! The VZAccess Manager Software is Windows only. Thankfully, after about an hour of online searching I found this video by Landon Stuckey that explained how to tether your Blackberry to a Mac using bluetooth. I tried it. It worked flawlessly and I didn’t even have to install any software. (Way to go Mac!)
Web Browser and Other Apps
Compared to the web browser on my iPod touch, the one on the Storm is a not as smooth. I’ve grown used to the iPod's multi-touch zoom and the smooth scrolling. The Blackberry is not as clean. The accelerometer also doesn’t appear to be as sensitive. Switching from portrait to landscape does not have the snappy response my iPod does and sometimes I have to turn it sideways and back again to trigger it.
I did manage to install Google sync to connect the Storm to my Google Calendar, ans was able to connect to my Yahoo mail account with no problems. The Blackberry Facebook app helps me keep track all my FB friends. There’s also a cool little brick game that reminiscent of the one on my old Atari game console. I have yet to play with apps like VZ Navigator, Word to Go, and many others. Guess what I’ll be doing over Thanksgiving break?
The list of available applications isn't nearly as extensive as the iPhone, but I'm sure they'll get more. This thing is still pretty new. Although I'm hoping they add a Pandora music app soon!
Bummer
One feature I was anxious to try was the visual voicemail - until I clicked on the app and it told me I needed to subscribe to the service for another $2.99/month. Bummer! Hey Verizon, doesn’t the iPhone include this for free?

Okay, So Why Not an iPhone?
Beyond the fact that I’d have to jailbreak an iPhone to use it for tethering, the AT&T service at school is really spotty. Teachers who have it complain that there are only certain spots on campus where they can get a signal. The same is true in my neighborhood. If not for that, I’m sure the iPhone would have been my first pick. For now, Verizon is my best choice given the reliability of the service in my area. We’ll see what things are like in two years when it’s time to renew.
Oh, and if you're wondering, the phone worked great for my presentation on Monday. The 3G connection was almost as fast as my home DSL.
This year rather than complaining, I used the lack of connectivity as an opportunity - or should I say excuse - to upgrade my phone to the new Blackberry Storm with it’s Internet tethering capabilities. Since I was presenting I really, really, needed to be able to get online. You understand, right?
So last Friday morning I got up extra early to wait in line at my local Verizon store and was one of the lucky few to get my hands on the new Storm. I’ve had it for a couple days now and still have lots to learn but here are a few first impressions.
It’s Clickable
I know it sounds gimmicky, but I really like the clickable screen. Essentially the whole screen is a big button. You position your finger on the touch screen where you want click and push down. The feedback on a click is really nice, although positioning my fingers on exactly the right place on the screen can be a little tricky.
The onscreen keyboard is really nice too. In landscape mode, you get a full keyboard. In portrait mode you get a half keyboard in which each key has two letters on it. I’m amazed by the interpretive ability of this keyboard to know the words or web sites I’m trying to type.
One annoying feature - when typing numbers you have to click the number key to make the keypad appear. When you type a number it goes back to letters and you have to press the number key again to make the numbers come back up again. This is a pain if you have to type in any number higher than 9.

Tethering
This feature was not an option for me, and Verizon seemed to be the only company that actually didn’t make tethering your laptop to your phone a violation of their terms of service. Although they do charge $15 to turn this feature on for a month. This is one reason I stayed away from the iPhone. I checked online and the only way I could find to tether an iPhone was to jailbreak it and hope that AT&T doesn’t catch you and charge you overages, or cancel your service. I know lots of people do it, but I didn’t want to go that route.
Since I got the phone on Friday and was presenting on Monday, one of the first things I wanted to try when I got home was connecting the phone to my Mac and going online with it. Imagine my dismay when I inserted the CD only to discover that there was NO MAC SOFTWARE!!! The VZAccess Manager Software is Windows only. Thankfully, after about an hour of online searching I found this video by Landon Stuckey that explained how to tether your Blackberry to a Mac using bluetooth. I tried it. It worked flawlessly and I didn’t even have to install any software. (Way to go Mac!)
Web Browser and Other Apps
Compared to the web browser on my iPod touch, the one on the Storm is a not as smooth. I’ve grown used to the iPod's multi-touch zoom and the smooth scrolling. The Blackberry is not as clean. The accelerometer also doesn’t appear to be as sensitive. Switching from portrait to landscape does not have the snappy response my iPod does and sometimes I have to turn it sideways and back again to trigger it.
I did manage to install Google sync to connect the Storm to my Google Calendar, ans was able to connect to my Yahoo mail account with no problems. The Blackberry Facebook app helps me keep track all my FB friends. There’s also a cool little brick game that reminiscent of the one on my old Atari game console. I have yet to play with apps like VZ Navigator, Word to Go, and many others. Guess what I’ll be doing over Thanksgiving break?
The list of available applications isn't nearly as extensive as the iPhone, but I'm sure they'll get more. This thing is still pretty new. Although I'm hoping they add a Pandora music app soon!
Bummer
One feature I was anxious to try was the visual voicemail - until I clicked on the app and it told me I needed to subscribe to the service for another $2.99/month. Bummer! Hey Verizon, doesn’t the iPhone include this for free?

Okay, So Why Not an iPhone?
Beyond the fact that I’d have to jailbreak an iPhone to use it for tethering, the AT&T service at school is really spotty. Teachers who have it complain that there are only certain spots on campus where they can get a signal. The same is true in my neighborhood. If not for that, I’m sure the iPhone would have been my first pick. For now, Verizon is my best choice given the reliability of the service in my area. We’ll see what things are like in two years when it’s time to renew.
Oh, and if you're wondering, the phone worked great for my presentation on Monday. The 3G connection was almost as fast as my home DSL.
Wednesday, November 19, 2008
Picasa Web Albums & Google Earth
Here's a quick and easy way to do use your own pictures for a place-based learning project using Picasa Web Albums and Google Earth. It's as easy as uploading your pictures to a Picasa Web Album and entering the location information. Once you do that, creating a Google Earth KML file with all your pictures is just a simple mouse click. Here's how it works...
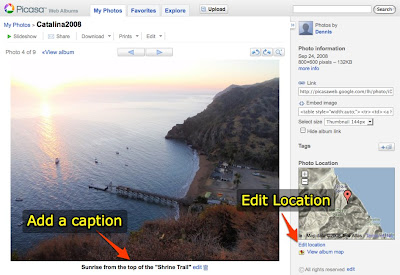
First, upload your pictures to a new Picasa Web Album. Add captions and then click Edit Location. (Click images to see a larger view.)
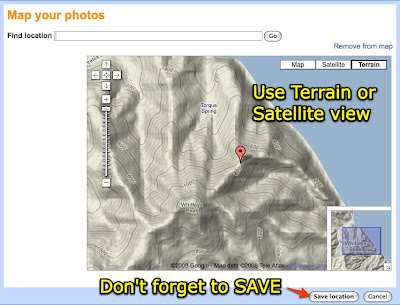
Drag the placemark to where the picture was taken and click SAVE.
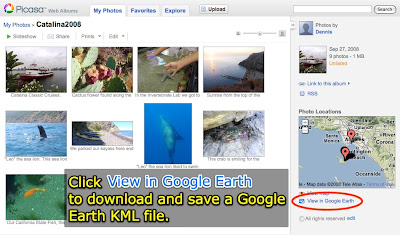
Repeat this process for each picture in your album. When you're all done, click "View in Google Earth. This will download a Google Earth KML file.
When the KML file opens in Google Earth, your pictures appear as placemarks along with your captions.
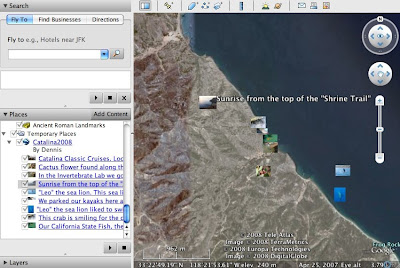
Clicking the the placemark opens an information bubble with a larger version of your picture and your caption.
Something like this would be a great way to follow up a class field trip or outdoor education experience. The example above was created with pictures from our 7th grade trip to Catalina Island. You could also share your own personal vacation photos with your class and add historical and geographic information relevant to your curriculum.
First, upload your pictures to a new Picasa Web Album. Add captions and then click Edit Location. (Click images to see a larger view.)

Drag the placemark to where the picture was taken and click SAVE.

Repeat this process for each picture in your album. When you're all done, click "View in Google Earth. This will download a Google Earth KML file.

When the KML file opens in Google Earth, your pictures appear as placemarks along with your captions.

Clicking the the placemark opens an information bubble with a larger version of your picture and your caption.
Something like this would be a great way to follow up a class field trip or outdoor education experience. The example above was created with pictures from our 7th grade trip to Catalina Island. You could also share your own personal vacation photos with your class and add historical and geographic information relevant to your curriculum.
Thursday, October 09, 2008
Get Web-Inspired
Inspiration is now a Web 2.0 tool. The past few days I've been playing with Webspiration Beta, which looks a lot like Inspiration but works in a web browser. The best thing about this new tool - it's collaborative. Like wikis and Google Docs, you can share your document and invite friends and colleagues to work on it too.

Above is a picture of a document I shared with some fellow teachers. I was pleased to see Webspiration gives me a couple of different ways to track the changes. You can Show History to see the progression of changes and who made them. Just like a wiki, you can view and rollback to a previous version.

Click on the Show Changes tool in the tool bar and little pop-ups will appear as you move over different parts of the document. These let you know who added that part and when the change was made. This tool can also be modified to show only the new changes since the last edit.
When you Manage Sharing you get to decide if those you invite are collaborators or simply viewers. You can also add tags to your document to help you find and organize your work or work that others have shared with you.
What would I like to see?
I think Inspiration is a great tool and that this web version takes a good tool and makes it even better. To make it work for me in a classroom I'd like to see a way to add student users without having to invite them with an e-mail address. An education version that lets a teacher create and manage student usernames and passwords would be great.
I like that you can import/export documents to Inspiration 8, but I couldn't find a way to export the outlines as a text or Word document. I suppose I could always copy and paste. It would also be nice to be able to have a URL to your document for easy sharing with others.
The great thing about Webspiration right now is that it is FREE. I'm not sure how long it will stay this way but I hope to take advantage of it while it lasts.
Go ahead and check it out and if you'd like to share a document with me, just let me know.

Above is a picture of a document I shared with some fellow teachers. I was pleased to see Webspiration gives me a couple of different ways to track the changes. You can Show History to see the progression of changes and who made them. Just like a wiki, you can view and rollback to a previous version.

Click on the Show Changes tool in the tool bar and little pop-ups will appear as you move over different parts of the document. These let you know who added that part and when the change was made. This tool can also be modified to show only the new changes since the last edit.
When you Manage Sharing you get to decide if those you invite are collaborators or simply viewers. You can also add tags to your document to help you find and organize your work or work that others have shared with you.
What would I like to see?
I think Inspiration is a great tool and that this web version takes a good tool and makes it even better. To make it work for me in a classroom I'd like to see a way to add student users without having to invite them with an e-mail address. An education version that lets a teacher create and manage student usernames and passwords would be great.
I like that you can import/export documents to Inspiration 8, but I couldn't find a way to export the outlines as a text or Word document. I suppose I could always copy and paste. It would also be nice to be able to have a URL to your document for easy sharing with others.
The great thing about Webspiration right now is that it is FREE. I'm not sure how long it will stay this way but I hope to take advantage of it while it lasts.
Go ahead and check it out and if you'd like to share a document with me, just let me know.
Saturday, October 04, 2008
Hey, you guyyyyys!!
If you were in elementary school in the 70's, you probably recognize that call as the voice of Rita Moreno yelling to let you know it's time for another episode of the Electric Company. If you're like me public television was a big part of your education too - from Sesame Street, Mister Roger's Neighborhood, and The Electric Company to science shows like Nova. I wonder how many of you in the classroom today use PBS programming and resources with your students?
Anyone? Anyone? Bueller?
Okay then, imagine my voice yelling "HEY YOU GUYYYYYS!!" to let you know about some of the great resources available now at www.pbs.org/teachers.
The people at PBS have been busy working to tag, catalog, and make "searchable" their vast online collection of resources. The result is the new PBS Teachers web site.

You can search by keyword, use the advanced search, or start with a subject area and drill down by selecting a grade level and a topic. For example, when I performed a keyword search for "sceintific method" my results included 24 lesson plans, 63 offline activities, 5 interactives, and 115 audio/video clips.

Trying to be more specific, I tried search for the Native American "Lakota" tribe. The results included 4 lesson plans including two from the Lewis and Clark Mini-Series, an interactive web site of Native American Storytellers, and a video clip from Antiques Roadshow telling the history of some Lakota artifacts.
As you start using this site more often, you'll probably want to register with PBS Teachers Connect and become a PBS Teacher. By signing in you can save and add your own tags to the resources you find for easy retrieval later.

You'll also become a part of a community of PBS Teachers where you can ask questions and participate in discussions.
For those of you searching for video resources keep in mind that this site is not a single repository, rather it provides links to the various PBS web sites where these resources reside. Depending on the program, videos formats may vary between Flash, RealPlayer, Quicktime, or Windows Media. Some clips, like those from Nova ScienceNow, can be downloaded and even transferred to an iPod, others can only be streamed from their web site.
Also keep in mind that this site is still in "beta". Look for new features and enhacements as they continue working to improve it.
Oh, and if you're a fan of the original Electric Company you might be interested to know that a new version of the show be premiering this January. Although I'm told that Morgan Freeman will not be appearing in the new show, it might still be worth checking out.
Have fun exploring the vast resources available at PBS Teachers.
Anyone? Anyone? Bueller?
Okay then, imagine my voice yelling "HEY YOU GUYYYYYS!!" to let you know about some of the great resources available now at www.pbs.org/teachers.
The people at PBS have been busy working to tag, catalog, and make "searchable" their vast online collection of resources. The result is the new PBS Teachers web site.

You can search by keyword, use the advanced search, or start with a subject area and drill down by selecting a grade level and a topic. For example, when I performed a keyword search for "sceintific method" my results included 24 lesson plans, 63 offline activities, 5 interactives, and 115 audio/video clips.

Trying to be more specific, I tried search for the Native American "Lakota" tribe. The results included 4 lesson plans including two from the Lewis and Clark Mini-Series, an interactive web site of Native American Storytellers, and a video clip from Antiques Roadshow telling the history of some Lakota artifacts.
As you start using this site more often, you'll probably want to register with PBS Teachers Connect and become a PBS Teacher. By signing in you can save and add your own tags to the resources you find for easy retrieval later.

You'll also become a part of a community of PBS Teachers where you can ask questions and participate in discussions.
For those of you searching for video resources keep in mind that this site is not a single repository, rather it provides links to the various PBS web sites where these resources reside. Depending on the program, videos formats may vary between Flash, RealPlayer, Quicktime, or Windows Media. Some clips, like those from Nova ScienceNow, can be downloaded and even transferred to an iPod, others can only be streamed from their web site.
Also keep in mind that this site is still in "beta". Look for new features and enhacements as they continue working to improve it.
Oh, and if you're a fan of the original Electric Company you might be interested to know that a new version of the show be premiering this January. Although I'm told that Morgan Freeman will not be appearing in the new show, it might still be worth checking out.
Have fun exploring the vast resources available at PBS Teachers.
Sunday, September 21, 2008
Two Cool Tools
Don't have a lot of time? Here's a short blog post with two cool tools that you can start using right away.
Online Stopwatch (www.online-stopwatch.com)
It is what it says it is. Couldn't get much simpler than this. Choose from several different types of countdowns. My personal favorite is the bomb. (Pictured below)

Create A Graph (nces.ed.gov/nceskids/createagraph)
Teach your students all about graphing. This tool lets them select a type of graph, enter their data on the form, and select colors and text styles. The final graph can be printed or saved as a PDF, JPEG, or various other types of image formats.
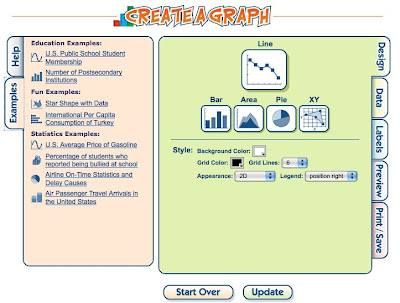
Here's a sample bar graph I made in just minutes...

Online Stopwatch (www.online-stopwatch.com)
It is what it says it is. Couldn't get much simpler than this. Choose from several different types of countdowns. My personal favorite is the bomb. (Pictured below)

Create A Graph (nces.ed.gov/nceskids/createagraph)
Teach your students all about graphing. This tool lets them select a type of graph, enter their data on the form, and select colors and text styles. The final graph can be printed or saved as a PDF, JPEG, or various other types of image formats.

Here's a sample bar graph I made in just minutes...

Subscribe to:
Posts (Atom)


