Remember that scene in the movie "Ferris Bueller's Day Off" where the economics teacher, played by Ben Stein, is asking his students questions followed by the line, "Anyone?...Anyone?..." It's the classic image of students that are NOT engaged. Hopefully your students are not as bored as his seem to be. (Side note: Boredom might actually be bad for your health.)
In "standard lecture mode" a teacher asks a question. One student responds while the others wait their turn. Some may be listening, but it's a sure bet that others are not. How do you get 100% of your class engaged and participating in the discussion?
Here's one way - WallWisher.com. With this tool, you can post a question or discussion item on a wall and all students can participate by adding a sticky note to the wall. Comments are limited to 160 characters. If you're in a computer lab or your kids have computers, you can do this in class and students can see their responses right away. You can also assign it to be done outside of class on their home computer. Walls can be shared between classes, schools, cities, states, countries. It's the Internet so this thing could even go global if you want.
How does it work? Watch the video below.
Showing posts with label tool. Show all posts
Showing posts with label tool. Show all posts
Wednesday, February 10, 2010

Sunday, October 04, 2009
Collaborative Maps
Ever sit around playing with a particular web tool and say, "This is great, but there's got to be a way to...(insert your idea here)." This particular question has been rolling around in my head regarding Google Maps. I LOVE Google Maps, but have been frustrated that I haven't found an easy way to create maps collaboratively. I know I can share Google Docs and have multiple people working on the same document, presentation, or spreadsheet, so why can't I do the same with maps? I was ready to write a blog post today pleading with Google to add a SHARE button to Google Maps when I was reminded of a tool that Andy Losik shared with me last spring.
There IS a way for my students contribute placemarks to a Google Map. A way that doesn't require them to use my login, or even have a Google account. Here's what you do:
Details
To set up your Google Form, you need to know that Map A List determines location using the following fields:
You'll then want to add three additional fields for the placemark information.
Once your form is done and you've started collecting information, go to Map A List and sign-up for an account. After that, you'll need to give Map A List authorization to access your Google Spreadsheet. Once that is done you can start creating your map. It's a simple step by step process.
Select the spreadsheet that contains your map data.
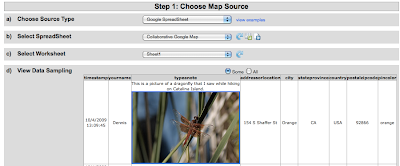
Match the fields in your spreadsheet to the ones that Map A List uses to create your placemarks.
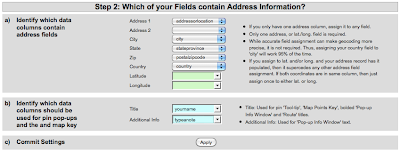
Once that is done, Map A List will check to see how many locations it can find based on the information in your spreadsheet. It does a surprisingly good job of determining locations even with incomplete information.
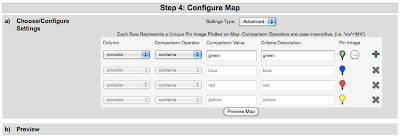
If you added a field that determines what type of placemark to use, the advanced feature on the next step is where you enter that information.
The last step is where you save your map and set a few final options. If you want to be able to send a link to your map to others or embed it on your web page or blog, you'll need to make it public.
Here's a link to the Google Map I created with my form. If you added data to the form, it may take a while to appear on the map. I set mine to update automatically, but noticed that sometimes I need to go in to Map A List and tell it to update the map manually if I want to see new data added the spreadsheet.
Classroom Applications
Students can participate in this type of collaborative map by...
Add lines? Highlight regions? Draw shapes? I haven't figured these out yet. If you have any ideas please share them.
By the way Google, this does not let you off the hook. I'd still like to see a SHARE button on Google Maps.
There IS a way for my students contribute placemarks to a Google Map. A way that doesn't require them to use my login, or even have a Google account. Here's what you do:
- Create a Google Form - Students will use this form to enter their placemark information. This will put their information into a Google Spreadsheet. No login required. They just need a link to the form.
- Use Map A List (www.mapalist.com) to auto-generate a Google Map that's linked to your spreadsheet.
Details
To set up your Google Form, you need to know that Map A List determines location using the following fields:
- Address 1
- Address 2
- City
- State
- Zip
- Country
- Latitude*
- Longitude*
You'll then want to add three additional fields for the placemark information.
- Title - What appears for the title of the placemark.
- Additional Info - What appears as the text in the popup window. This field will also accept HTML code. So any code you can copy & paste into Google Maps will work here too.
- Placemark Symbol Identifier (optional) - This could be a multiple choice item in that your students use to select what type of placemark they want.
Once your form is done and you've started collecting information, go to Map A List and sign-up for an account. After that, you'll need to give Map A List authorization to access your Google Spreadsheet. Once that is done you can start creating your map. It's a simple step by step process.
Select the spreadsheet that contains your map data.

Match the fields in your spreadsheet to the ones that Map A List uses to create your placemarks.

Once that is done, Map A List will check to see how many locations it can find based on the information in your spreadsheet. It does a surprisingly good job of determining locations even with incomplete information.
If you added a field that determines what type of placemark to use, the advanced feature on the next step is where you enter that information.

The last step is where you save your map and set a few final options. If you want to be able to send a link to your map to others or embed it on your web page or blog, you'll need to make it public.
Here's a link to the Google Map I created with my form. If you added data to the form, it may take a while to appear on the map. I set mine to update automatically, but noticed that sometimes I need to go in to Map A List and tell it to update the map manually if I want to see new data added the spreadsheet.
Classroom Applications
Students can participate in this type of collaborative map by...
- Mapping Birthplaces. It could be their own, or someone else's. Our 5th grade is working on immigrant reports right now. This would be a fun way to share their information.
- Historical Places. Students could work together on a class project locating and posting information about historical places around their state or country.
- What's The Weather Today? Classes from several different schools could pick a day and share the weather. They could even embed a picture of what it looks like outside.
- Breakfast Around the World. The form could be shared with as many people as possible to find out what people around the world eat for breakfast. Hmmmm. This idea sounds familiar.
- I'm sure you can think of other ideas...
Add lines? Highlight regions? Draw shapes? I haven't figured these out yet. If you have any ideas please share them.
By the way Google, this does not let you off the hook. I'd still like to see a SHARE button on Google Maps.
Thursday, October 09, 2008
Get Web-Inspired
Inspiration is now a Web 2.0 tool. The past few days I've been playing with Webspiration Beta, which looks a lot like Inspiration but works in a web browser. The best thing about this new tool - it's collaborative. Like wikis and Google Docs, you can share your document and invite friends and colleagues to work on it too.

Above is a picture of a document I shared with some fellow teachers. I was pleased to see Webspiration gives me a couple of different ways to track the changes. You can Show History to see the progression of changes and who made them. Just like a wiki, you can view and rollback to a previous version.

Click on the Show Changes tool in the tool bar and little pop-ups will appear as you move over different parts of the document. These let you know who added that part and when the change was made. This tool can also be modified to show only the new changes since the last edit.
When you Manage Sharing you get to decide if those you invite are collaborators or simply viewers. You can also add tags to your document to help you find and organize your work or work that others have shared with you.
What would I like to see?
I think Inspiration is a great tool and that this web version takes a good tool and makes it even better. To make it work for me in a classroom I'd like to see a way to add student users without having to invite them with an e-mail address. An education version that lets a teacher create and manage student usernames and passwords would be great.
I like that you can import/export documents to Inspiration 8, but I couldn't find a way to export the outlines as a text or Word document. I suppose I could always copy and paste. It would also be nice to be able to have a URL to your document for easy sharing with others.
The great thing about Webspiration right now is that it is FREE. I'm not sure how long it will stay this way but I hope to take advantage of it while it lasts.
Go ahead and check it out and if you'd like to share a document with me, just let me know.

Above is a picture of a document I shared with some fellow teachers. I was pleased to see Webspiration gives me a couple of different ways to track the changes. You can Show History to see the progression of changes and who made them. Just like a wiki, you can view and rollback to a previous version.

Click on the Show Changes tool in the tool bar and little pop-ups will appear as you move over different parts of the document. These let you know who added that part and when the change was made. This tool can also be modified to show only the new changes since the last edit.
When you Manage Sharing you get to decide if those you invite are collaborators or simply viewers. You can also add tags to your document to help you find and organize your work or work that others have shared with you.
What would I like to see?
I think Inspiration is a great tool and that this web version takes a good tool and makes it even better. To make it work for me in a classroom I'd like to see a way to add student users without having to invite them with an e-mail address. An education version that lets a teacher create and manage student usernames and passwords would be great.
I like that you can import/export documents to Inspiration 8, but I couldn't find a way to export the outlines as a text or Word document. I suppose I could always copy and paste. It would also be nice to be able to have a URL to your document for easy sharing with others.
The great thing about Webspiration right now is that it is FREE. I'm not sure how long it will stay this way but I hope to take advantage of it while it lasts.
Go ahead and check it out and if you'd like to share a document with me, just let me know.
Sunday, September 21, 2008
Two Cool Tools
Don't have a lot of time? Here's a short blog post with two cool tools that you can start using right away.
Online Stopwatch (www.online-stopwatch.com)
It is what it says it is. Couldn't get much simpler than this. Choose from several different types of countdowns. My personal favorite is the bomb. (Pictured below)

Create A Graph (nces.ed.gov/nceskids/createagraph)
Teach your students all about graphing. This tool lets them select a type of graph, enter their data on the form, and select colors and text styles. The final graph can be printed or saved as a PDF, JPEG, or various other types of image formats.
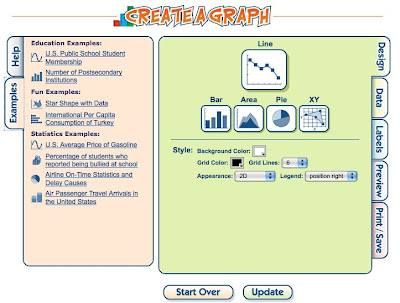
Here's a sample bar graph I made in just minutes...

Online Stopwatch (www.online-stopwatch.com)
It is what it says it is. Couldn't get much simpler than this. Choose from several different types of countdowns. My personal favorite is the bomb. (Pictured below)

Create A Graph (nces.ed.gov/nceskids/createagraph)
Teach your students all about graphing. This tool lets them select a type of graph, enter their data on the form, and select colors and text styles. The final graph can be printed or saved as a PDF, JPEG, or various other types of image formats.

Here's a sample bar graph I made in just minutes...

Tuesday, December 18, 2007
Festive, Fun, and Free
Yes, it's true! Christmas Break is just hours away,
And when that last school bell rings you will jump up and say,
"No more lesson planning, or staying up late
grading papers! (At least until 2008.)"
Instead of watching the kids deck the classroom and halls,
You'll be fighting adults as you dash through the malls.
Grabbing last minute gifts to put under the tree.
Hoping maybe you might get that last Christmas Wii.
But in the midst of this spending spell you've been put under
You suddenly stop, shake your head, then you wonder...
Perhaps the best gifts have no paper or bow.
Maybe these gifts come from Web 2.0
They're posted online, so at the press of a key.
You've got holiday fun that's both festive and free.
So when you escape from the malls and the stores,
And finish all your 200 pre-Christmas chores,
Take a minute to check out these holiday sites.
I hope they give you and yours some joys and delights.
Make Your Own SnowFlake

Remember back in school when you folded paper and cut out snowflakes? Here and online version without the mess. Thanks to fellow Twitterer mrmartinsclass. Note: I also spent way too much time playing that TimezAttack game he mentioned this morning.
Gingerbread House

Remember those Highlights magazines you used to read as a kid while waiting at the dentist's office? Here is a holiday activity from their web site. You get to decorate your own gingerbread house. If the music gets annoying, you can always turn it off. (Thanks to jgingerich for mentioning this one on your blog.)
ScrapBlog

Use this great free site to create your own custom "e-cards". They've got some great Christmas templates to get you started. Just add your own photos, videos, or sounds. When you're done, you can e-mail your family and friends a link to your scrapbook, embed it in your blog or wiki, or share it on MySpace or Facebook.
Do you have any other fun Holiday sites to share? Please post a comment and let me know.
And when that last school bell rings you will jump up and say,
"No more lesson planning, or staying up late
grading papers! (At least until 2008.)"
Instead of watching the kids deck the classroom and halls,
You'll be fighting adults as you dash through the malls.
Grabbing last minute gifts to put under the tree.
Hoping maybe you might get that last Christmas Wii.
But in the midst of this spending spell you've been put under
You suddenly stop, shake your head, then you wonder...
Perhaps the best gifts have no paper or bow.
Maybe these gifts come from Web 2.0
They're posted online, so at the press of a key.
You've got holiday fun that's both festive and free.
So when you escape from the malls and the stores,
And finish all your 200 pre-Christmas chores,
Take a minute to check out these holiday sites.
I hope they give you and yours some joys and delights.
Make Your Own SnowFlake

Remember back in school when you folded paper and cut out snowflakes? Here and online version without the mess. Thanks to fellow Twitterer mrmartinsclass. Note: I also spent way too much time playing that TimezAttack game he mentioned this morning.
Gingerbread House

Remember those Highlights magazines you used to read as a kid while waiting at the dentist's office? Here is a holiday activity from their web site. You get to decorate your own gingerbread house. If the music gets annoying, you can always turn it off. (Thanks to jgingerich for mentioning this one on your blog.)
ScrapBlog

Use this great free site to create your own custom "e-cards". They've got some great Christmas templates to get you started. Just add your own photos, videos, or sounds. When you're done, you can e-mail your family and friends a link to your scrapbook, embed it in your blog or wiki, or share it on MySpace or Facebook.
Do you have any other fun Holiday sites to share? Please post a comment and let me know.
Subscribe to:
Posts (Atom)


