Remember that scene in the movie "Ferris Bueller's Day Off" where the economics teacher, played by Ben Stein, is asking his students questions followed by the line, "Anyone?...Anyone?..." It's the classic image of students that are NOT engaged. Hopefully your students are not as bored as his seem to be. (Side note: Boredom might actually be bad for your health.)
In "standard lecture mode" a teacher asks a question. One student responds while the others wait their turn. Some may be listening, but it's a sure bet that others are not. How do you get 100% of your class engaged and participating in the discussion?
Here's one way - WallWisher.com. With this tool, you can post a question or discussion item on a wall and all students can participate by adding a sticky note to the wall. Comments are limited to 160 characters. If you're in a computer lab or your kids have computers, you can do this in class and students can see their responses right away. You can also assign it to be done outside of class on their home computer. Walls can be shared between classes, schools, cities, states, countries. It's the Internet so this thing could even go global if you want.
How does it work? Watch the video below.
Showing posts with label collaboration. Show all posts
Showing posts with label collaboration. Show all posts
Wednesday, February 10, 2010

Saturday, November 07, 2009
Collaborative Maps Update
In my last post I mentioned that, " I'd still like to see a SHARE button on Google Maps." Today I noticed that when I go to My Maps, I see a "collaborate" link at the top.

Clicking on it will let you invite others to collaborate with you on your map.

I'm not sure how long that feature has been there. (It was probably already there when I wrote my last post.) For now I'll just fool myself into thinking that Google liked my idea and decided to add this feature because of me. :)
It's worth noting that collaborating on a custom Google Map still requires users to register for a Google Account, something that requires an e-mail. If you'd like your students to be able to work together on a map without having to register for a Google Account, Linda Dierks suggests ScribbleMaps.


Clicking on it will let you invite others to collaborate with you on your map.

I'm not sure how long that feature has been there. (It was probably already there when I wrote my last post.) For now I'll just fool myself into thinking that Google liked my idea and decided to add this feature because of me. :)
It's worth noting that collaborating on a custom Google Map still requires users to register for a Google Account, something that requires an e-mail. If you'd like your students to be able to work together on a map without having to register for a Google Account, Linda Dierks suggests ScribbleMaps.
Thanks for the idea Linda.
As an alternate way to have students collaborate on maps, I've been using Scribble Maps (http://scribblemaps.com). It gives many of the same features Google Maps can without having to set up forms. You can save the map you create to a unique URL and password (still no ID needed) and share it with others. They can save changes as long as they have the correct URL and password.

Sunday, October 04, 2009
Collaborative Maps
Ever sit around playing with a particular web tool and say, "This is great, but there's got to be a way to...(insert your idea here)." This particular question has been rolling around in my head regarding Google Maps. I LOVE Google Maps, but have been frustrated that I haven't found an easy way to create maps collaboratively. I know I can share Google Docs and have multiple people working on the same document, presentation, or spreadsheet, so why can't I do the same with maps? I was ready to write a blog post today pleading with Google to add a SHARE button to Google Maps when I was reminded of a tool that Andy Losik shared with me last spring.
There IS a way for my students contribute placemarks to a Google Map. A way that doesn't require them to use my login, or even have a Google account. Here's what you do:
Details
To set up your Google Form, you need to know that Map A List determines location using the following fields:
You'll then want to add three additional fields for the placemark information.
Once your form is done and you've started collecting information, go to Map A List and sign-up for an account. After that, you'll need to give Map A List authorization to access your Google Spreadsheet. Once that is done you can start creating your map. It's a simple step by step process.
Select the spreadsheet that contains your map data.
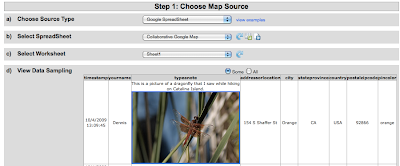
Match the fields in your spreadsheet to the ones that Map A List uses to create your placemarks.
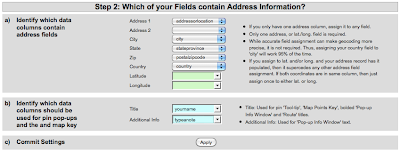
Once that is done, Map A List will check to see how many locations it can find based on the information in your spreadsheet. It does a surprisingly good job of determining locations even with incomplete information.
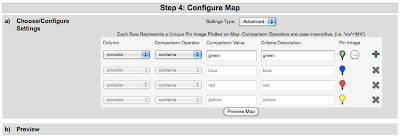
If you added a field that determines what type of placemark to use, the advanced feature on the next step is where you enter that information.
The last step is where you save your map and set a few final options. If you want to be able to send a link to your map to others or embed it on your web page or blog, you'll need to make it public.
Here's a link to the Google Map I created with my form. If you added data to the form, it may take a while to appear on the map. I set mine to update automatically, but noticed that sometimes I need to go in to Map A List and tell it to update the map manually if I want to see new data added the spreadsheet.
Classroom Applications
Students can participate in this type of collaborative map by...
Add lines? Highlight regions? Draw shapes? I haven't figured these out yet. If you have any ideas please share them.
By the way Google, this does not let you off the hook. I'd still like to see a SHARE button on Google Maps.
There IS a way for my students contribute placemarks to a Google Map. A way that doesn't require them to use my login, or even have a Google account. Here's what you do:
- Create a Google Form - Students will use this form to enter their placemark information. This will put their information into a Google Spreadsheet. No login required. They just need a link to the form.
- Use Map A List (www.mapalist.com) to auto-generate a Google Map that's linked to your spreadsheet.
Details
To set up your Google Form, you need to know that Map A List determines location using the following fields:
- Address 1
- Address 2
- City
- State
- Zip
- Country
- Latitude*
- Longitude*
You'll then want to add three additional fields for the placemark information.
- Title - What appears for the title of the placemark.
- Additional Info - What appears as the text in the popup window. This field will also accept HTML code. So any code you can copy & paste into Google Maps will work here too.
- Placemark Symbol Identifier (optional) - This could be a multiple choice item in that your students use to select what type of placemark they want.
Once your form is done and you've started collecting information, go to Map A List and sign-up for an account. After that, you'll need to give Map A List authorization to access your Google Spreadsheet. Once that is done you can start creating your map. It's a simple step by step process.
Select the spreadsheet that contains your map data.

Match the fields in your spreadsheet to the ones that Map A List uses to create your placemarks.

Once that is done, Map A List will check to see how many locations it can find based on the information in your spreadsheet. It does a surprisingly good job of determining locations even with incomplete information.
If you added a field that determines what type of placemark to use, the advanced feature on the next step is where you enter that information.

The last step is where you save your map and set a few final options. If you want to be able to send a link to your map to others or embed it on your web page or blog, you'll need to make it public.
Here's a link to the Google Map I created with my form. If you added data to the form, it may take a while to appear on the map. I set mine to update automatically, but noticed that sometimes I need to go in to Map A List and tell it to update the map manually if I want to see new data added the spreadsheet.
Classroom Applications
Students can participate in this type of collaborative map by...
- Mapping Birthplaces. It could be their own, or someone else's. Our 5th grade is working on immigrant reports right now. This would be a fun way to share their information.
- Historical Places. Students could work together on a class project locating and posting information about historical places around their state or country.
- What's The Weather Today? Classes from several different schools could pick a day and share the weather. They could even embed a picture of what it looks like outside.
- Breakfast Around the World. The form could be shared with as many people as possible to find out what people around the world eat for breakfast. Hmmmm. This idea sounds familiar.
- I'm sure you can think of other ideas...
Add lines? Highlight regions? Draw shapes? I haven't figured these out yet. If you have any ideas please share them.
By the way Google, this does not let you off the hook. I'd still like to see a SHARE button on Google Maps.
Thursday, April 02, 2009
It's All About the Network
Have you seen those Verizon commercials that have hundreds of support people standing behind their wireless phone user? The idea is to let you know that you're not alone, that you've got people behind you to keep you connected. Their slogan - It's all about the network. That's how I felt about MY network this week.
On Tuesday morning I worked with one of our third grade classes. They had just read the book "George Washington's Breakfast" by Jean Fritz. Our idea was to create a little form, asking the world what they ate for breakfast. I opened up a new form in Google Docs and had the kids help write the survey description and questions. Then I posted a link to the form on Twitter and Plurk asking you to show them the power of our network.
The results were practically instantaneous. Within 15 minutes we had a dozen responses. By that evening there were over a hundred. When I checked the next morning there were almost 400! Most were from the US, but we also had responses from Australia, New Zealand, Japan, Scotland, Italy, China, Singapore, Korea, and Brazil!
I thought it would be fun to add the responses to a Google Map, so I started copying and pasting what people ate into placemarks. I had to stop after the first 200. I just couldn't keep up with the responses.
View Larger Map
We're still working on what we're going to do with all the data, but if you'd like to share our project with your students, here is a link to our spreadsheet. (As I write this, we're up to 469 responses.)
I'd like to thank all those who contributed to the survey and passed it on to others. The kids had a blast watching the results come in. We were all amazed by the huge response. Our network ROCKS!
On Tuesday morning I worked with one of our third grade classes. They had just read the book "George Washington's Breakfast" by Jean Fritz. Our idea was to create a little form, asking the world what they ate for breakfast. I opened up a new form in Google Docs and had the kids help write the survey description and questions. Then I posted a link to the form on Twitter and Plurk asking you to show them the power of our network.
The results were practically instantaneous. Within 15 minutes we had a dozen responses. By that evening there were over a hundred. When I checked the next morning there were almost 400! Most were from the US, but we also had responses from Australia, New Zealand, Japan, Scotland, Italy, China, Singapore, Korea, and Brazil!
I thought it would be fun to add the responses to a Google Map, so I started copying and pasting what people ate into placemarks. I had to stop after the first 200. I just couldn't keep up with the responses.
View Larger Map
We're still working on what we're going to do with all the data, but if you'd like to share our project with your students, here is a link to our spreadsheet. (As I write this, we're up to 469 responses.)
I'd like to thank all those who contributed to the survey and passed it on to others. The kids had a blast watching the results come in. We were all amazed by the huge response. Our network ROCKS!
Thursday, October 09, 2008
Get Web-Inspired
Inspiration is now a Web 2.0 tool. The past few days I've been playing with Webspiration Beta, which looks a lot like Inspiration but works in a web browser. The best thing about this new tool - it's collaborative. Like wikis and Google Docs, you can share your document and invite friends and colleagues to work on it too.

Above is a picture of a document I shared with some fellow teachers. I was pleased to see Webspiration gives me a couple of different ways to track the changes. You can Show History to see the progression of changes and who made them. Just like a wiki, you can view and rollback to a previous version.

Click on the Show Changes tool in the tool bar and little pop-ups will appear as you move over different parts of the document. These let you know who added that part and when the change was made. This tool can also be modified to show only the new changes since the last edit.
When you Manage Sharing you get to decide if those you invite are collaborators or simply viewers. You can also add tags to your document to help you find and organize your work or work that others have shared with you.
What would I like to see?
I think Inspiration is a great tool and that this web version takes a good tool and makes it even better. To make it work for me in a classroom I'd like to see a way to add student users without having to invite them with an e-mail address. An education version that lets a teacher create and manage student usernames and passwords would be great.
I like that you can import/export documents to Inspiration 8, but I couldn't find a way to export the outlines as a text or Word document. I suppose I could always copy and paste. It would also be nice to be able to have a URL to your document for easy sharing with others.
The great thing about Webspiration right now is that it is FREE. I'm not sure how long it will stay this way but I hope to take advantage of it while it lasts.
Go ahead and check it out and if you'd like to share a document with me, just let me know.

Above is a picture of a document I shared with some fellow teachers. I was pleased to see Webspiration gives me a couple of different ways to track the changes. You can Show History to see the progression of changes and who made them. Just like a wiki, you can view and rollback to a previous version.

Click on the Show Changes tool in the tool bar and little pop-ups will appear as you move over different parts of the document. These let you know who added that part and when the change was made. This tool can also be modified to show only the new changes since the last edit.
When you Manage Sharing you get to decide if those you invite are collaborators or simply viewers. You can also add tags to your document to help you find and organize your work or work that others have shared with you.
What would I like to see?
I think Inspiration is a great tool and that this web version takes a good tool and makes it even better. To make it work for me in a classroom I'd like to see a way to add student users without having to invite them with an e-mail address. An education version that lets a teacher create and manage student usernames and passwords would be great.
I like that you can import/export documents to Inspiration 8, but I couldn't find a way to export the outlines as a text or Word document. I suppose I could always copy and paste. It would also be nice to be able to have a URL to your document for easy sharing with others.
The great thing about Webspiration right now is that it is FREE. I'm not sure how long it will stay this way but I hope to take advantage of it while it lasts.
Go ahead and check it out and if you'd like to share a document with me, just let me know.
Saturday, October 13, 2007
VoiceThread Update
Okay, I'm really becoming a fan of VoiceThread. In fact I'll even be including it in a Digital Storytelling workshop I'm presenting later this month. Last week VoiceThread updated it's site and added a few new features. One big difference is that there are now two versions of VoiceThread - the free version and the Pro version. Those of us who signed up for the free version are now limited to creating only 3 voicethreads with a maximum of 50 slides each. The pro version, which costs $29.95/year, gives you unlimited VoiceThreads and storage and also give you the ability to upload mp3 files for your comments. So pro users can, for example, record, mix, and edit their audio comments using something like Audacity to create more professional sounding presentations.
Here's the good news. K-12 educators can sign up for a special pro account for free. First you need to register for a free account and login. Next you find and click where it says "Go Pro". At the bottom of the page will be a link that says "K-12 Educators Click Here". That will take you to the educator application form.
How is the new VoiceThread site different from the old one? Here's a look at some of the changes.
When you view a VoiceThread the screen looks a little different.

If you have trouble reading my comments, click the image to make it larger.
When uploading and rearranging pictures they've made things a little easier and given you a few more options.

Click image to make it larger.
When you click SHARE to add friends to your VoiceThread account or invite friends to view or edit your presentations, you can now see each friend and their edit rights all on one screen. Note: The button to add new friends is now located at the very bottom of your friends list. It took me a little while to find this.

Click the image to make it larger.
When setting my sharing options, I like to set my VoiceThreads to "Public, no comments". This allows anyone to see my presentations, but only those people I invite can comment or edit it. Since I generally trust those who I invite, I turn comment moderation off so when my friends comment, their comment is posted immediately. If you are working with students and concerned about privacy issues, you may want to keep your VoiceThread private and turn the moderation on so you can check what your students say before the rest of the class can hear it.
Want to participate in a VoiceThread. I've created one for an elementary project called Seasons. I'm looking for students or teachers to post pictures and share what the seasons are like where they live. Please comment or e-mail me if you would like to participate. Click on my profile for my e-mail link. Here is how the project looks so far:
If you can't view the embedded presentation, here is a link to it at the VoiceThread site: http://voicethread.com/#b10538
Happy storytelling.
Here's the good news. K-12 educators can sign up for a special pro account for free. First you need to register for a free account and login. Next you find and click where it says "Go Pro". At the bottom of the page will be a link that says "K-12 Educators Click Here". That will take you to the educator application form.
How is the new VoiceThread site different from the old one? Here's a look at some of the changes.
When you view a VoiceThread the screen looks a little different.

If you have trouble reading my comments, click the image to make it larger.
When uploading and rearranging pictures they've made things a little easier and given you a few more options.

Click image to make it larger.
When you click SHARE to add friends to your VoiceThread account or invite friends to view or edit your presentations, you can now see each friend and their edit rights all on one screen. Note: The button to add new friends is now located at the very bottom of your friends list. It took me a little while to find this.

Click the image to make it larger.
When setting my sharing options, I like to set my VoiceThreads to "Public, no comments". This allows anyone to see my presentations, but only those people I invite can comment or edit it. Since I generally trust those who I invite, I turn comment moderation off so when my friends comment, their comment is posted immediately. If you are working with students and concerned about privacy issues, you may want to keep your VoiceThread private and turn the moderation on so you can check what your students say before the rest of the class can hear it.
Want to participate in a VoiceThread. I've created one for an elementary project called Seasons. I'm looking for students or teachers to post pictures and share what the seasons are like where they live. Please comment or e-mail me if you would like to participate. Click on my profile for my e-mail link. Here is how the project looks so far:
If you can't view the embedded presentation, here is a link to it at the VoiceThread site: http://voicethread.com/#b10538
Happy storytelling.
Sunday, September 30, 2007
Your Pictures Tell A Story
It's Sunday night and I'm sitting at home watching the new Ken Burns series "The War" on my local PBS station. If you've seen Ken Burns work before- like the Civil War series - you know that he is a master of telling a story using still pictures. His combination of pictures and voices, often from the very people in the pictures themselves, not only tell a compelling story but they often reach down and grab you emotionally as well. There's something about adding a human voice that brings the photos to life.
One great tool for doing this yourself is Microsoft's Photo Story3, but you're limited to working on your own project and your own computer. One person, one idea. If you really want your stories to take on a life of their own look at VoiceThread. It adds a unique collaborative element to photos and voices by allowing others to add their own voice comments to your photos or upload their own photos and comments. Imagine the collaborative possibilities!
Here's how it works. First you go to VoiceThread and register. Your ID is your e-mail address. Next you create a new VoiceThread, give it a title and a description, and even add some tags for searching.
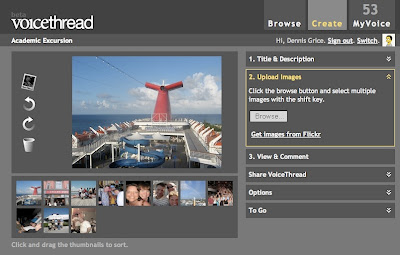
Now you're ready to start uploading pictures. Pictures can be from your computer or brought in from your Flickr account.
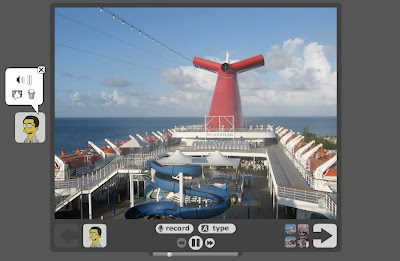
Then it's time to start adding your voice comments to your pictures. All you need to do is go to "View and Comment" and click the record button to start adding your voice.
Now that you've got your thread started, it's time to share it with others. Click on Share VoiceThread and you can invite others to view and comment on your pictures. Once you invite someone you can grant them edit rights, giving them the ability to upload their own pictures. By default, your VoiceThread is private - only those you invite can see it or comment. You can make it public two different ways. 1) Allowing anyone to view and comment. 2) Anyone can view but only those you invite can comment.
NOTE: If you want to be able to embed your VoiceThread on a blog or web page, it needs to be public.
To try out some of the collaborative capabilities of VoiceThread, I created a test project about the Discovery National Institute I attended this summer. I invited several of my fellow shipmates to participate, asking them to add a picture and share a story from our "Academic Excursion". Here's a what the project looks like so far... (If you click on the photo you can zoom in and out.)
If you can't see the embedded VoiceThread, follow this link:
http://fresh.voicethread.com/#b7495
After some experimenting we discovered that pictures brought in from Flickr seem to work more reliably than those that were uploaded directly. I also noticed that the audio quality varied depending on the microphone and audio settings on different machines, but overall I was quite pleased with how easy it was to create a collaborative project.
If you want to use VoiceThread with your students and don't want them to have to register with an e-mail address, you can go to Yahoo or HotMail and create a generic class e-mail address that you can use as your VoiceThread ID. Then you can add additional identities for your students to use when commenting on photos. Since VoiceThreads can be private, only those who know the e-mail address and the password will be able to see the students pictures or hear their voices. VoiceThread has posted directions for teachers that explain how to do this.
Would you like to participate in a VoiceThread project? Amy Lundstrom has started one called Landforms Where We Live. Take a look at it and if you'd like to participate, leave me a comment.
Or go ahead a start your own VoiceThread. Here are just a few ideas to get you started:
One great tool for doing this yourself is Microsoft's Photo Story3, but you're limited to working on your own project and your own computer. One person, one idea. If you really want your stories to take on a life of their own look at VoiceThread. It adds a unique collaborative element to photos and voices by allowing others to add their own voice comments to your photos or upload their own photos and comments. Imagine the collaborative possibilities!
Here's how it works. First you go to VoiceThread and register. Your ID is your e-mail address. Next you create a new VoiceThread, give it a title and a description, and even add some tags for searching.

Now you're ready to start uploading pictures. Pictures can be from your computer or brought in from your Flickr account.

Then it's time to start adding your voice comments to your pictures. All you need to do is go to "View and Comment" and click the record button to start adding your voice.
Now that you've got your thread started, it's time to share it with others. Click on Share VoiceThread and you can invite others to view and comment on your pictures. Once you invite someone you can grant them edit rights, giving them the ability to upload their own pictures. By default, your VoiceThread is private - only those you invite can see it or comment. You can make it public two different ways. 1) Allowing anyone to view and comment. 2) Anyone can view but only those you invite can comment.
NOTE: If you want to be able to embed your VoiceThread on a blog or web page, it needs to be public.
To try out some of the collaborative capabilities of VoiceThread, I created a test project about the Discovery National Institute I attended this summer. I invited several of my fellow shipmates to participate, asking them to add a picture and share a story from our "Academic Excursion". Here's a what the project looks like so far... (If you click on the photo you can zoom in and out.)
If you can't see the embedded VoiceThread, follow this link:
http://fresh.voicethread.com/#b7495
After some experimenting we discovered that pictures brought in from Flickr seem to work more reliably than those that were uploaded directly. I also noticed that the audio quality varied depending on the microphone and audio settings on different machines, but overall I was quite pleased with how easy it was to create a collaborative project.
If you want to use VoiceThread with your students and don't want them to have to register with an e-mail address, you can go to Yahoo or HotMail and create a generic class e-mail address that you can use as your VoiceThread ID. Then you can add additional identities for your students to use when commenting on photos. Since VoiceThreads can be private, only those who know the e-mail address and the password will be able to see the students pictures or hear their voices. VoiceThread has posted directions for teachers that explain how to do this.
Would you like to participate in a VoiceThread project? Amy Lundstrom has started one called Landforms Where We Live. Take a look at it and if you'd like to participate, leave me a comment.
Or go ahead a start your own VoiceThread. Here are just a few ideas to get you started:
- If you teach 5th Grade, perhaps you could try to get students from different states to post a picture and information about their state.
- Have students scan an old picture of their grandparents and asj them share what happened in that picture - a living history.
- Younger children may be interested to see what the seasons look like in different parts of the country. Have students upload a picture of what Fall is like in their area and describe the scenery and the weather.
Friday, June 01, 2007
FREE Inspiration
Writers use them for brainstorming. Scientists use them for solving problems and organizing information. Whether you call it a word web, a concept map, or just a bunch of little boxes connected with arrows, the process writing down concepts, figuring out how they are related, and connecting them together can be a valuable teaching tool.
Two of the most well-known software tools for doing this are Inspiration and its primary grade companion, Kidspiration. These programs are great, but they are not cheap. In fact school licensing for these can be almost as expensive as licensing Microsoft Office.
Now, finally, there is a FREE alternative to Inspiration. It’s called Cmap Tools. You can download it from their web site. (http://cmap.ihmc.us/download) Mac, Windows, and Linux versions are available.
When you install it and run it for the first time, you will be asked to create a username and password. This is required so later on you can share your concept maps with others or even set up a collaborative concept map that can be edited by multiple users. Even if you don’t want to do this, you still need to create a username and password in order to use the product.

If you’re used to using Inspiration, you may find the Cmap Tools does things a little differently, but those differences are not major. You can’t do “rapid fire” concept maps and there is no clip art included in the software. You can add images, links, and annotations. You can also link to Word documents, videos, and other Cmap files.
To get a good idea of what the process of creating a concept map is like, take a look at this tutorial video they have created. Creating Concepts and Propositions (requires Quicktime)
They also have other tutorial videos that explain how to use the software:
Adding Resources
Introduction to the Views Window
How to Create a Folder
The one thing that Cmap Tools seems to be lacking is the ability to export your concept map as an outline that can be opened in Microsoft Word. There is an “outline view” that can be exported as text (.txt) but the text does not have the traditional outline formatting (I, II, III, A, B, C, etc.)

On the plus side, your concept maps can be exported as jpegs and as web pages (html). You can also upload your map to one of their public Cmap servers (I have yet to try this) and make it viewable to anyone with a web browser. Once it is online, your map is given a unique web address (URL). Anyone with a web browser can access it, and anyone with Cmap Tools can be invited to contribute and edit it.
I’m already brainstorming on ways this software could be used with students. Here are a couple of ideas:
“What’s the Connection?”
Use Cmap Tools to create a collection of terms. Save the file. Have students open the file, look at the terms, and figure out how they are related. It’s up to them to move the terms around and link them together with arrows using the correct propositions.
“Family Tree”
Have students start by typing their name as the first concept. Then they add their relatives around them as different concepts. Finally they need to add links stating each person’s relationship to the student (brother, sister, cousin, uncle) as well as their relationships to each other.
I still think Kidspiration is a valuable tool for primary grades and would not want to replace it, but I could definitely use Cmap Tools with older students – grades 5 and up.
Check it out and let me know what you think.
Image Credit: http://cmap.ihmc.us/Support/Help/
Two of the most well-known software tools for doing this are Inspiration and its primary grade companion, Kidspiration. These programs are great, but they are not cheap. In fact school licensing for these can be almost as expensive as licensing Microsoft Office.
Now, finally, there is a FREE alternative to Inspiration. It’s called Cmap Tools. You can download it from their web site. (http://cmap.ihmc.us/download) Mac, Windows, and Linux versions are available.
When you install it and run it for the first time, you will be asked to create a username and password. This is required so later on you can share your concept maps with others or even set up a collaborative concept map that can be edited by multiple users. Even if you don’t want to do this, you still need to create a username and password in order to use the product.

If you’re used to using Inspiration, you may find the Cmap Tools does things a little differently, but those differences are not major. You can’t do “rapid fire” concept maps and there is no clip art included in the software. You can add images, links, and annotations. You can also link to Word documents, videos, and other Cmap files.
To get a good idea of what the process of creating a concept map is like, take a look at this tutorial video they have created. Creating Concepts and Propositions (requires Quicktime)
They also have other tutorial videos that explain how to use the software:
Adding Resources
Introduction to the Views Window
How to Create a Folder
The one thing that Cmap Tools seems to be lacking is the ability to export your concept map as an outline that can be opened in Microsoft Word. There is an “outline view” that can be exported as text (.txt) but the text does not have the traditional outline formatting (I, II, III, A, B, C, etc.)

On the plus side, your concept maps can be exported as jpegs and as web pages (html). You can also upload your map to one of their public Cmap servers (I have yet to try this) and make it viewable to anyone with a web browser. Once it is online, your map is given a unique web address (URL). Anyone with a web browser can access it, and anyone with Cmap Tools can be invited to contribute and edit it.
I’m already brainstorming on ways this software could be used with students. Here are a couple of ideas:
“What’s the Connection?”
Use Cmap Tools to create a collection of terms. Save the file. Have students open the file, look at the terms, and figure out how they are related. It’s up to them to move the terms around and link them together with arrows using the correct propositions.
“Family Tree”
Have students start by typing their name as the first concept. Then they add their relatives around them as different concepts. Finally they need to add links stating each person’s relationship to the student (brother, sister, cousin, uncle) as well as their relationships to each other.
I still think Kidspiration is a valuable tool for primary grades and would not want to replace it, but I could definitely use Cmap Tools with older students – grades 5 and up.
Check it out and let me know what you think.
Image Credit: http://cmap.ihmc.us/Support/Help/
Monday, February 05, 2007
A New Way to Process Words
If you haven't figured it out by now, I love stuff that's FREE. Imagine my joy when I discovered Google Docs. It's a free basic word processor. There's no software to install - it runs right inside your web browser. You can import a variety of word processing documents from Word (.doc), Star Office, Open Office (.odt), and Rich Text files (.rtf). While you can't import pictures or add clip art, you do have the advantage of being able to access, edit, and print from any computer with Internet access. Just log in with your Google username and password. (I was able to use the same one I use for Blogger.)
 But wait there's more!
What makes Google Docs so powerful is the fact that you can Add Collaborators to your documents. By "inviting" others to edit your documents, you can have several people working together on the same document at the same time. You see changes as they happen. What a powerful tool for learning! When a document is finished it can be posted directly from Google Docs to your blog. If you make a document "public" users can subscribe to an RSS feed so they can be updated when any changes are made.
While a great tool like this doesn't convince me to put good old Microsoft Word in mothballs just yet, it sure does make me look at word processing in a whole new way. Google Docs is a great Web 2.0 tool.
Oh, wait! Did I forget to mention you can also do spreadsheets too? It imports Excel (.xls), Open Office (.ods), and Comma Separated (.csv) files.

For more info about Google Docs, take the tour.
 But wait there's more!
What makes Google Docs so powerful is the fact that you can Add Collaborators to your documents. By "inviting" others to edit your documents, you can have several people working together on the same document at the same time. You see changes as they happen. What a powerful tool for learning! When a document is finished it can be posted directly from Google Docs to your blog. If you make a document "public" users can subscribe to an RSS feed so they can be updated when any changes are made.
While a great tool like this doesn't convince me to put good old Microsoft Word in mothballs just yet, it sure does make me look at word processing in a whole new way. Google Docs is a great Web 2.0 tool.
Oh, wait! Did I forget to mention you can also do spreadsheets too? It imports Excel (.xls), Open Office (.ods), and Comma Separated (.csv) files.

For more info about Google Docs, take the tour.
Subscribe to:
Posts (Atom)


