Showing posts with label help sheet. Show all posts

Sunday, November 11, 2007

A Not So Simple Solution

Sorry if this post gets a little more technical than usual. Sometimes there just doesn't seem to be a simple solution.

I really like Microsoft PhotoStory. It's a simple, easy tool that lets teachers and students create digital stories. What's not simple is trying to play these stories on a Mac. This has become a problem because some of our teachers like to post their PhotoStory files on their class web site. Parents with Macs at home can't view them.

Flip4Mac is a free Quicktime plugin that allows the Mac Quicktime player to play Windows Media files (wmv's) but for some reason it will not seem to play files created by PhotoStory. Real Player for Mac won't play them either.

After a some research I discovered something about the PhotoStory Video Codec. Apparently Microsoft PhotoStory 3 does NOT use the standard Windows Media Video (WMV) codec but a special codec developed for compressing still images: Windows Media Video 9 Image v2.

One solution for playing these files on a Mac is to convert them to .mov files. I've used Zamzar and that seems to work but the file size increases. My 6.5MB Photostory file converted to a 16.2MB .mov file. Even though the file size more than doubles, the picture quality of the converted file doesn't seem to be as good.

Another solution is to use use Windows Media Encoder (another free download from Microsoft) to convert your PhotoStory file to a file that will play on Quicktime with the Flip4Mac plug-in.


When you convert your file using Windows Media Encoder, use the following settings:
  1. For "Content Distribution" select - File Download (Computer Playback)
  2. For "Encoding Options" select...
  • Video - VHS Quality (250 Kbps VBR)
  • Audio - CD Quality (VBR)

My 6.5MB photostory file converted to a 11.3MB wmv file that plays on my Mac.

Using media encoder seems to give me a better quality conversion and lower file size than using Zamzar and converting to a .mov file.

Now I just have to train our teachers to convert their completed video file before they post it online AND tell our Mac using parents that they need to download and install the Flip4Mac plug-in to view their class videos.

As I said, sometimes the solution is not that simple.

Saturday, August 18, 2007

Free to YouTube

Maybe this has happened to you. You're online at home and you run across a great video on YouTube. "This would be a great video to show my students!" You exclaim, ignoring for a moment that fact that you are talking to yourself again.

Problem is, you get to school the next morning and discover that your Internet filter blocks YouTube. You sink into depression. That great lesson you were planning is now ruined. "It's not fair!" You cry.

Stop right there! Before you give up and decide to drown your sorrows in a pint of Ben & Jerry's, consider this possible solution...

Zamzar to the rescue!

Zamzar is a handy little Web 2.0 tool that converts files and e-mails them to you. You can upload files to Zamzar, select the file format you want it to be, and Zamzar will e-mail you the converted file. But Zamzar also converts online videos!


Every YouTube video has a URL. Copy this URL and go to Zamzar.


Then...


You'll see a progress bar as the video is uploaded to Zamzar. Then you'll get a message telling you that once the video is converted it will be sent to your e-mail. A few minutes later, check your e-mail. The message will link you back to Zamzar where you can download a copy of the video to your computer.

Once you have the video downloaded, you can show that file to your class or put it in your Power Point presentations. (Be sure to give proper credit.) Since it is now a file on your computer, you don't even need to have an Internet connection to view it.


Friday, June 01, 2007

FREE Inspiration

Writers use them for brainstorming. Scientists use them for solving problems and organizing information. Whether you call it a word web, a concept map, or just a bunch of little boxes connected with arrows, the process writing down concepts, figuring out how they are related, and connecting them together can be a valuable teaching tool.

Two of the most well-known software tools for doing this are Inspiration and its primary grade companion, Kidspiration. These programs are great, but they are not cheap. In fact school licensing for these can be almost as expensive as licensing Microsoft Office.

Now, finally, there is a FREE alternative to Inspiration. It’s called Cmap Tools. You can download it from their web site. (http://cmap.ihmc.us/download) Mac, Windows, and Linux versions are available.

When you install it and run it for the first time, you will be asked to create a username and password. This is required so later on you can share your concept maps with others or even set up a collaborative concept map that can be edited by multiple users. Even if you don’t want to do this, you still need to create a username and password in order to use the product.

If you’re used to using Inspiration, you may find the Cmap Tools does things a little differently, but those differences are not major. You can’t do “rapid fire” concept maps and there is no clip art included in the software. You can add images, links, and annotations. You can also link to Word documents, videos, and other Cmap files.

To get a good idea of what the process of creating a concept map is like, take a look at this tutorial video they have created. Creating Concepts and Propositions (requires Quicktime)

They also have other tutorial videos that explain how to use the software:
Adding Resources
Introduction to the Views Window
How to Create a Folder

The one thing that Cmap Tools seems to be lacking is the ability to export your concept map as an outline that can be opened in Microsoft Word. There is an “outline view” that can be exported as text (.txt) but the text does not have the traditional outline formatting (I, II, III, A, B, C, etc.)

On the plus side, your concept maps can be exported as jpegs and as web pages (html). You can also upload your map to one of their public Cmap servers (I have yet to try this) and make it viewable to anyone with a web browser. Once it is online, your map is given a unique web address (URL). Anyone with a web browser can access it, and anyone with Cmap Tools can be invited to contribute and edit it.

I’m already brainstorming on ways this software could be used with students. Here are a couple of ideas:

“What’s the Connection?”
Use Cmap Tools to create a collection of terms. Save the file. Have students open the file, look at the terms, and figure out how they are related. It’s up to them to move the terms around and link them together with arrows using the correct propositions.

“Family Tree”
Have students start by typing their name as the first concept. Then they add their relatives around them as different concepts. Finally they need to add links stating each person’s relationship to the student (brother, sister, cousin, uncle) as well as their relationships to each other.

I still think Kidspiration is a valuable tool for primary grades and would not want to replace it, but I could definitely use Cmap Tools with older students – grades 5 and up.

Check it out and let me know what you think.

Image Credit: http://cmap.ihmc.us/Support/Help/

Thursday, April 26, 2007

A Simple Solution

This Internet tip is an oldie, but a goodie. I've known about it for a long time but never really made use of it until this week. It really saved me a lot of trouble.
There are some great web sites out there for primary kids. One of the best ones out there Starfall, but there are other good ones as well. I know I can trust first graders to double click on Internet Explorer, but I don't want to deal with having them type in a web address. Even asking them go to Favorites and select the correct one, can be a chore. To solve this, I've taken some of the web sites most often used by our primary grades and put them in the Links toolbar. This way the kids just have to open Internet Explorer, click on the correct link in the toolbar, and Viola! they are at the correct web site in no time.

Here's how...

1. Open Internet Explorer.
2. Go to the VIEW menu, select TOOLBARS, and make sure the LINKS toolbar is checked.

If it is, and you still don't see the links toolbar, it may be hiding down at the end of your Address Bar.

If so, just go to drag it down below the Address Bar. If it won't move, you may need to unlock the toolbar - Go to VIEW, TOOLBARS, and uncheck LOCK THE TOOLBARS.
3. Go to a website you want to add to your toolbar.
4. Drag the address from the Address Bar down to the Links Bar...

...and a new link is added.
5. To make room in the Links Bar for more links, you may want to shorten the name of the link. To do this, right-click on the link and select properties. Click on the General tab and change the name to something shorter.

6. To delete a link from your toolbar, just right-click on the link and select DELETE.

Here are some primary grade web sites I have on my Links Bar: Starfall, Mr. PicassoHead, Ben's Guide to US Government, White House Kids Page, US States Games, I'm sure you can think of some other great ones too.

FIREFOX and SAFARI users, this works for you too. It's called the Bookmarks toolbar.

FIREFOX: Go to VIEW and select BOOKMARKS TOOLBAR. Drag web sites to the toolbar.
SAFARI: Go to VIEW and select SHOW BOOKMARKS BAR. Drag web sites to the toolbar.

Friday, March 09, 2007

Kids Become the Teacher with Wikispaces

Several weeks ago, 8th grade started a project using Wikispaces. Every year our 8th graders go to Washington D.C. In the past they have had to write a report about DC that included information about various monuments, the White House, and other places on the tour.

This year our history teacher, Mr. Harrison, decided to try something different. Roles were reversed and the students took on the job of teacher They were divided into groups of four and asked to design a webquest. Together they were to create several worksheets or tests about different places they would visit in DC. Then they worked as a team to design their own page on Mr. Harrison’s Wikispace. Pages would include links to the worksheet document (they were also required to post an answer key), links to web sites that Mr. Harrison would use to answer the questions, and pictures. The groups were evaluated based on how well they completed their task and how well they worked together as a group.

The Setup

To begin this project, we first had to create a space for Mr. Harrison at Wikispaces. Wikispaces offers free public spaces, but charges for private spaces - unless your a teacher. To sign up for a free, private space (only registered space users can see or edit pages) we went to www.wikispaces.com/site/for/teachers100K and registered.

Once we had a space set up, I worked with Mr. Harrison to create his page that included the project guidelines and instructions for his students. Next I created a blank page for each group of students to edit.

The final step was to create user accounts for each student in the class. Normally, a new user needs to register a unique username and password with Wikispaces and supply their own e-mail address. Then they need to be invited to join the Wikispace by creator or owner of that space. This would not work for us because we did not want to students to give out their e-mail address and we wanted control over the usernames assigned to each student. Fortunately, Wikispaces makes this process easier for teachers. All we had to do is follow the procedure they list on their help page for teachers. We sent an e-mail to help@wikispaces.com gave them the usernames and passwords for each student along with the name of the space we wanted them to join. (Our students already have unique user ID’s on our online learning system and I was able to use the same names for Wikispaces.) After a few days, all the students showed up as members in Mr. Harrison’s space.

Student Instruction

Once everything was finally setup, it was time to get the students working. I took one class period and presented a lesson explaining the nuts and bolts of editing a wikispaces page. I also posted screen captures of certain procedures online for students to review later. Here are links to the screen captures:
I’ve found that when working with students, it’s best to keep the instructions brief. I give them just enough info to get started and let them know what is expected for the final product. It’s up to them figure out the rest on their own and solve technical problems within their group.

One of the advantages of using a wiki is that it keeps track of any changes made to a page. At any time, you can click on the history button and see what the page looked like as changes were made. You can also see which user made those changes. In addition to tracking changes, the history button provides students a safety net. If something gets “totally messed up” you can simply revert back to a previous version of the page and begin working from there. This ability to go back in time makes wikis a powerful tool. Checking page history is also a great way for a teacher to see that everyone in the group is participating.

In addition to the page history, each page also has it’s own discussion board. I was surprised to see how many students used it to communicate with their group as they worked on their pages from home. It was fun to read the posts and observe as students helped each other and answered each other’s questions. One or two kids even got reprimanded by by their group for not participating. Mr. Harrison and I were able to monitor all group communication to make sure nothing inappropriate or malicious was being posted. I was even able to answer a few questions myself - from the comfort of my own living room.

Wrapping Up

At the project deadline Mr. Harrison locked all the student’s pages. This prevented them from making any fixes or updates after the the assignment was supposed to be finished. Most student pages met or exceeded our expectations.

As part of the project, each group was required to write an evaluation, explaining what was learned as they worked on their webquests. Here are some of the comments:

“I thought that this process was very new and different, and at times, very frustrating. But we were able to either leave comments for each other or call each other.” ... “I really liked the idea of the team responsibilities, because that way no one person gets all the load dumped on them.”
“We had to work together to finish this project and it was a little hectic. The hardest part was having to split up the duties evenly so that we all got a grade on it.”
“In the end this was a very good project. It was way better than doing a report. One problem was it was difficult when you could not edit at them same time. This caused some problems but in the end we fixed them. Also at some points it would get very annoying with the page. You would do something and save but it would not keep it. But it was fixed and we finished our project. This was a very good project and we would much rather do this than a whole report by ourselves.”
“This project was very fun for all of us and was a wonderful learning experience, but somewhat difficult. We like the format of the website, but the toolbar was a bit hard. If we could change something about this site it would have to be the pictures, because they were somewhat hard to download. We definitely thought this was 100 times better than a 20 page report!”
Many groups experienced frustration with the Wikispaces page editor as things that looked great in the editor did not always look the same once they were saved. We let students know up front that the editor could be a little quirky at times, and that they would need to work together to solve problems. For the most part, members of the group stepped up and were able to solve their own technical problems.

All in all, I think our first venture into the use of wikis in the classroom went quite well. We’re already looking at other ways to use this tool. If you’re curious about how you can use wikis with your students, Teachers First has some great ideas.

Curious what some our final projects look like? Since this is a private space I can’t include a link, but here is a brief video tour.

Mr. Harrison’s Wikispace Tour (Windows Media Player Required)

Friday, January 05, 2007

Don't Tell Me, Show Me

I am the king of help sheets. Here at my school I've created and distributed tech help sheets that explain everything from "How to check your school e-mail at home" to "How to link to UnitedStreaming video assignments from your Blackboard course".

Unfortunately, what takes 30 minutes to explain in writing, I can usually demonstrate in 30 seconds on my computer screen. Well now my days of help sheet writing may be over.

Windows Media Encoder is a free download from Microsoft. (Thanks Steve Dembo for mentioning it in your blog.) It has several capabilities, but the one that caught my attention is its ability to record your screen activity.

Now I can hook a microphone up to my computer and record myself demonstrating various computer tasks for our students or teachers. When I'm done I have a Windows Media file that can be posted or e-mailed to whoever needs help. When anyone watches the video, it will be just like they are watching my screen and listening to me explain what to do.

Using the medium quality setting, 90 seconds of video takes up about 512K (1/2 MB) of space. What I've found works best is to break a task into several short 1-2 minute clips rather than record one long 10 minute clip. The shorter clips let your viewers select the part of the demo they want to watch, plus the smaller file size means they'll download faster.

Since I was not able to use Windows Media Encoder to record itself, I've posted a help sheet that explains how to use it.

[Using Windows Media Encoder]


Okay, so my days of help sheet writing aren't completely over.

Thursday, December 07, 2006

Would It Make A Sound?

This is a test to see if I can post pictures to my blog directly from Picasa. I'm already a fan of Picasa for quick and dirty photo editing. Many of our teachers use it for class pictures (parties, field trips, etc.) and to show slideshows to their class. This is just one more cool feature. (No Honda CR-V's were hurt in the making of this picture.)
Did I mention it's FREE? [picasa.google.com] Posted by Picasa

Here's a very basic help sheet for creating slide shows using Picasa.
[Make a Slide Show with Picasa]

Wednesday, December 06, 2006

The Power Point Diet

If you've ever used your own digital pictures in Power Point presentations, you may have noticed that your Power Point files tend to be quite large. If you've got a 6 or 8 megapixel camera, just a few photos can make your presentation eat up as much as 20 or 30 MB on your hard disk. (You don't want to e-mail that to any of your friends who still use dial-up.)

How would you like to trim that file by as much as 80 or 90%? You can! Here's how...

Open one of your "overweight" Power Point files.
Find a slide that has one of your pictures on it.
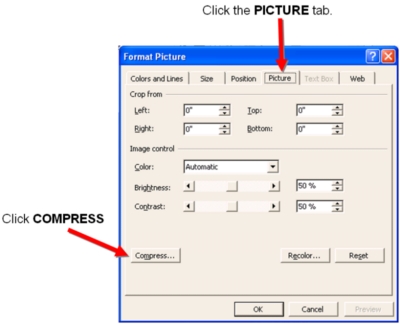
Double-click on the picture to bring up the "Format Picture" window.


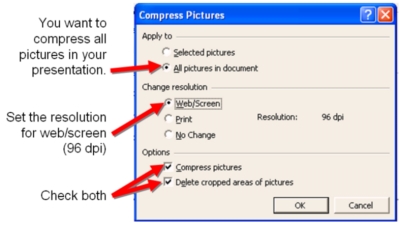
For maximum file compression use the settings indicated in the figure above. You should not notice any significant loss of quality in your pictures, but when you save your presentation, you'll see that you've trimmed quite a bit off the file size.

FREE Video Podcasts for Classrooms

You know how much I love the word "FREE". Now you can get free videos to share with your students by subscribing to video podcasts on iTunes.

WHAT DO I NEED?
  • a computer
  • Internet access (cable, DSL or something fast is definately a plus!)
  • iTunes Software (version 7 is available free at www.apple.com/itunes/download)
WHAT DON'T I NEED?
an iPod - Believe it or not, you don't need an iPod to watch a podcast. You can watch it on your computer. Or you can connect your computer to a data projector.

Okay, so what do I have to do?
Launch iTunes and go to the Music Store. I found some great video podcasts by searching for the following...
  • "Ecogeeks" - Science video podcasts that explain science topics in a fun and exciting way. Hosts and filmmakers are trained biologists. For more info about the episodes visit their site: www.thewildclassroom.com/home/nav/podastingscience.html
  • "Electronic Field Trips" - A series of 4 – 8 minute Webisodes from the Ball State University Electronic Field Trip Program. The current list includes videos from Field Trips to Hawaii (Volcanos, rainforests, etc.) and Historic Philadelphia (Independence Hall, Revolutionary War).
  • "isallaboutmath" - (no spaces) Covers various topics in mathematics. Good for upper elementary & middle school. Topics include: triangular numbers, summations, mathematical induction.
Not all video podcasts are available in the podcast directory. NASA's Brain Bites are a collection of 30 second to 1 minute videos on various topics including "What happens if you drop an hammer and a feather on the moon?" and "What time is it in space?"
To subscribe to these podcasts you'll need to go the "Advanced" menu in iTunes. Select "Subscribe to Podcast". Type the following URL in the box and click "Add":
http://feeds.feedburner.com/brainbites/nasa

These are just 4 video podcasts I was able to find last weekend. If you find any other good ones, please let me know.

Thanks.

[Click here to download this post in a printable handout.]